

An ankle sprain can interrupt your training and leave you wondering when you can run again. Whether you rolled your ankle on a trail or stepped awkwardly off a curb, giving it the right care now can help you return with greater confidence.
Can You Run on a Sprained Ankle?
Avoid running on a newly sprained ankle, especially if you have pain, swelling, a limp, or a feeling that the ankle might give way. Even a mild sprain needs time to recover. Returning to running depends on how well your ankle moves, supports your weight, and handles activity, rather than simply how many days have passed.
An ankle sprain happens when the ligaments that support the joint are overstretched or torn. Recovery usually involves initial protection followed by appropriate movement and exercises to rebuild strength and balance. The American Academy of Orthopaedic Surgeons recommends gradual rehabilitation, with weight-bearing and exercise progressing as tolerated.
This guide explains early care, rehabilitation exercises, and what to consider before returning to running, along with ways to reduce the risk of another sprain.
📌 Get medical help promptly if you cannot bear weight or walk more than a few steps, or if pain or swelling is severe or worsening. A visibly deformed ankle or a numb, cold, or discolored foot needs emergency assessment. These warning signs can indicate an injury that needs more than home care.
1. Types of Ankle Sprains
Ankle sprains occur when the ligaments around the ankle joint are stretched or torn, usually as a result of sudden twists or turns. Depending on which ligaments are affected and how the injury occurs, ankle sprains can be categorized into different types:
- Inversion Sprain
This is the most common type of ankle sprain, occurring when the foot rolls inward, causing the ankle’s outer ligaments (lateral ligaments) to stretch or tear. Runners are particularly prone to inversion sprains when running on uneven surfaces or if their foot lands awkwardly. - Eversion Sprain
An eversion sprain happens when the foot rolls outward, stretching or tearing the inner ligaments (deltoid ligament) of the ankle. Though less common than inversion sprains, eversion sprains tend to be more severe and take longer to heal. - High Ankle Sprain (Syndesmotic Sprain)
This type of sprain involves the ligaments that connect the two bones of the lower leg, the tibia and fibula, and is typically caused by a forceful twisting motion. High ankle sprains are less frequent but often more difficult to treat, requiring longer recovery times compared to inversion or eversion sprains.

Image credit: Wikimedia Commons
Each type of ankle sprain requires specific treatment and recovery protocols, so identifying the type of sprain is key to ensuring proper care and preventing further injury.
Disclaimer: This post is not medical advice and is not intended to provide diagnosis or treatment for any medical conditions. Please consult a physician or other health care professional for your specific health care and/or medical needs or concerns.
2. The 3 Grades of Ankle Sprains
Ankle sprains are categorized into three grades based on their severity, ranging from mild ligament stretching to complete tears. These grades help determine the appropriate treatment and recovery plan.
Grade 1 – Mild Sprain
- Slight overstretching of the ligaments.
- Mild pain with minimal swelling and tenderness.
- Slight difficulty with weight-bearing activities like walking or running.
- Usually heals quickly with rest and light rehabilitation.
Grade 2 – Moderate Sprain
- Partial tear of one or more ligaments, commonly the anterior talofibular ligament (ATFL).
- Moderate pain, noticeable swelling, and some joint instability.
- Bruising may occur around the ankle.
- Difficulty walking or performing weight-bearing activities, requiring more extended recovery.
Grade 3 – Severe Sprain
- Complete tear of the ligament, typically the anterior talofibular ligament.
- Significant pain, swelling, and bruising.
- Severe ankle instability, making it difficult or impossible to bear weight.
- Often requires a longer rehabilitation period, and in some cases, surgery may be necessary.
📌 If you’re uncertain whether you have foot or ankle pain, use Mayo Clinic’s Foot or Ankle Pain Symptom Checker for guidance.
The most common sprain is a lateral ankle sprain, also known as rolling the ankle.
3. Immediate Treatment for a Sprained Ankle: The R.I.C.E. Method
🔔 Before starting treatment, it’s important to seek professional medical attention if any of the following are present:
- An open wound
- Severe pain or intense swelling
- Visible deformity of the ankle
- Signs of infection include a fever over 100°F (37.8°C).
- Inability to put weight on the injured leg
If you’re unsure whether the sprain is Grade 2 or 3, it’s better to consult a healthcare professional for proper diagnosis and treatment.
R.I.C.E. Guidelines For Ankle Sprains
In the first few days after an ankle sprain, follow the R.I.C.E. method to reduce pain and swelling:
- Rest: Stop running and initially protect the ankle from painful activities. Gradually resume gentle movement and weight-bearing as tolerated, following clinical advice. More severe sprains may need crutches or temporary immobilization.
- Ice: Apply ice three times a day for 20 minutes. Always use a barrier, like a cloth, between the ice and your skin.
- Compression: Use an elastic bandage or compression ankle brace to reduce swelling and support the ankle. Make sure it’s snug but not too tight to maintain proper circulation.
- Elevation: Raise the injured ankle above your heart to minimize swelling.

While the R.I.C.E. method helps in the immediate aftermath, ankle sprains need ongoing care to ensure a full recovery. Early treatment with active exercises is key to speeding up healing and reducing the risk of future sprains.
Active Exercises for Recovery
For Grade 1 or 2 sprains, gradually introducing appropriate exercises as pain and swelling improve can:
- Reduce pain
- Speed up recovery
- Strengthen muscles and improve coordination
- Lower the risk of recurrent ankle sprains
A good example is the Heel/Toe Raises exercise shown in the video below.
Start with gentle movements and progress to weight-bearing exercises as your ankle tolerates them, following any clinical advice.
Reduce or stop an exercise if pain increases, and seek guidance if symptoms persist. If pain or swelling is worse afterward or the next morning, reduce the exercise difficulty or amount.
4. When to Seek Professional Help
While many ankle sprains can be managed with home care and self-treatment, there are situations where it’s crucial to consult a healthcare professional to ensure proper recovery and avoid complications.
🚩 Here are some red flags indicating that professional medical help is needed:
Severe or Persistent Pain
If you experience intense pain that doesn’t subside with rest, ice, and over-the-counter pain relief, it may be a sign of a more serious injury. Persistent pain could indicate a fracture or severe ligament damage that requires medical evaluation.
Significant Swelling
While some swelling is normal with an ankle sprain, excessive or rapidly increasing swelling can be a concern. If the swelling does not improve with elevation and compression, or if it seems disproportionate to the injury, a medical assessment is warranted.
Inability to Bear Weight
If you cannot put weight on the injured ankle or walk more than a few steps, seek medical assessment promptly. This may indicate a significant sprain or a fracture. Do not wait 24 – 48 hours to get help.
Joint Instability or Loss of Range of Motion
If you feel that the ankle is unstable or if you experience a significant loss of range of motion, it could indicate serious ligament damage. A healthcare professional can provide a thorough examination and recommend appropriate rehabilitation strategies.
Signs of Infection
Symptoms such as redness, warmth, or fever around the injured area could signal an infection, especially if an open wound or the injury becomes increasingly painful. Immediate medical attention is necessary to address any potential infection.
Failure to Improve
Suppose you’ve been following standard self-care measures, such as rest, ice, and elevation, and you don’t see any improvement within a few days. In that case, it’s important to consult a healthcare professional. A delayed or improper healing process may require more specialized treatment.
Consulting a healthcare professional ensures that you receive an accurate diagnosis and an appropriate treatment plan tailored to your specific injury. Early intervention can help prevent complications and facilitate a more efficient recovery.
5. Sprained Ankle Treatment After a Few Days
Begin gentle exercises as symptoms allow, following any advice from your healthcare professional. Progress from comfortable ankle movements to standing exercises when you can bear weight comfortably. Add single-leg and balance challenges gradually as strength and control improve.
Key Guidelines for Exercise:
- Keep movements comfortable and controlled. Reduce or stop if pain increases.
- Start slow, just a few minutes each day.
- Gradually increase difficulty: begin on both feet, progress to one leg, and eventually add an unstable surface like a cushion.
Step 1: Two-Legged Exercises
- Weight Shift: Shift your body weight from toes to heels and back.
- Pelvic Transfer: Move your weight side-to-side while shifting your pelvis.
- Heel/Toe Raises: Raise onto your toes and then back down onto your heels.
- Heel Transfer: Shift weight to your heels with your toes lifted.
Step 2: One-Legged Exercises
Make sure to practice on both legs, starting with the healthy one.
- Balance: Stand on one leg for 7-30 seconds. Repeat for 3 sets.
- Leg Swings: Swing your free leg back and forth 20 times while balancing.
- Toe Raises: Shift your weight while raising your toes 20 times.
- Balance on an Unstable Surface: Stand on a cushion or any unstable surface, and shift your weight to your heels while keeping your toes in the air.

You can also increase difficulty by closing your eyes or practicing on a balance board for an added challenge.
6. Effective Ankle Sprain Rehabilitation Plan
Rehabilitation from an ankle sprain should be approached systematically, with a focus on gradually restoring mobility, strength, and balance. Here’s a clear step-by-step plan based on the severity of the sprain:
Early-Stage Rehab (Mobility Exercises, Light Stretches)
Objective: Restore ankle mobility and reduce stiffness while minimizing pain.
- Ankle Circles
- How to Do It: Sit or lie down with your leg extended. Slowly rotate your foot in a circular motion, 10 times in each direction.
- Frequency: Perform 2-3 sets, 2-3 times a day.
- Alphabet Exercise
- How to Do It: Sit with your leg extended. Use your big toe to trace the letters of the alphabet in the air. This helps to improve the range of motion.
- Frequency: Complete the alphabet once or twice, 2-3 times a day.
- Towel Stretch
- How to Do It: Sit with your leg extended and loop a towel around the ball of your foot. Gently pull the towel towards you until you feel a stretch in your calf and Achilles tendon. Hold for 15-30 seconds.
- Frequency: Perform 2-3 times, holding the stretch 2-3 times a day.
- Dorsiflexion Stretch
- How to Do It: Sit on the floor with your legs extended. Flex your foot towards you by gently pulling on your toes. Hold the stretch for 15-30 seconds.
- Frequency: Repeat 2-3 times, 2-3 times a day.
Mid-Stage Rehab (Strengthening Exercises)
Objective: Build strength in the ankle and lower leg to support recovery and prevent future injuries.
- Resistance Band Exercises
- How to Do It: Sit with your leg extended. Loop a resistance band around the ball of your foot. Push your foot against the band (plantar flexion), hold for a few seconds, and then slowly return. Repeat 10-15 times.
- Frequency: Perform 2-3 sets, 1-2 times a day.
- Calf Raises
- How to Do It: Stand with your feet hip-width apart. Slowly raise your heels off the ground, balancing on the balls of your feet. Lower back down slowly. Repeat 15-20 times.
- Frequency: Complete 2-3 sets, 1-2 times a day.
- Toe Taps
- How to Do It: Sit with your leg extended. Tap your toes up and down against the floor or a wall. Repeat 15-20 times.
- Frequency: Perform 2-3 sets, 1-2 times a day.
- Heel Walks
- How to Do It: Walk on your heels for 30-60 seconds, keeping your toes off the ground. This helps strengthen the front of the lower leg.
- Frequency: Complete 2-3 sets, 1-2 times a day.
Late-Stage Rehab (Balance and Proprioception Exercises)
Objective: Improve balance, proprioception, and agility to return to running safely and prevent re-injury.
- Single-Leg Balance
- How to Do It: Stand on one leg, aiming to balance for 30-60 seconds. Progress to doing this on an unstable surface, such as a BOSU ball or balance pad.
- Frequency: Perform 2-3 sets, 1-2 times a day.
- Wobble Board Exercises
- How to Do It: Stand on a wobble board or balance disc. Try to maintain balance and perform gentle movements to engage ankle stabilizers. Start with basic balancing and progress to more challenging exercises.
- Frequency: Perform 2-3 sets, 1-2 times a day.
- Agility Drills
- How to Do It: Incorporate agility drills such as ladder drills, cone drills, or side shuffles. Focus on quick changes in direction and maintaining balance.
- Frequency: Include 1-2 agility sessions per week.
- Dynamic Balance Exercises
- How to Do It: Perform exercises like standing on one leg while moving your other leg forward and backward or side to side. This mimics the dynamic movements of running and helps improve proprioception.
- Frequency: Complete 2-3 sets, 1-2 times a day.
If that feels too easy, try performing the exercise on a cushion or another unstable surface for added challenge.

By following this structured rehabilitation plan, you can effectively manage your recovery from an ankle sprain, gradually restoring strength, mobility, and balance to return to running safely.
Check out this video for more guidance on ankle sprain exercises:
7. When Can You Start Running After an Ankle Sprain?
Missing runs can be frustrating, but returning too soon can lead to another injury. There is no single recovery timeline that makes running safe for everyone. The severity of your sprain, your rehabilitation progress, and how your ankle handles activity all matter.
Signs Your Ankle Is Becoming Ready
Before trying running, consider whether:
- You can walk briskly without pain or limping.
- Your ankle’s movement and strength are close to those of your uninjured side.
- You can perform controlled calf raises and balance on the injured leg without pain or giving way.
- You feel confident putting weight through the ankle.
- Your rehabilitation activities do not cause increased pain or swelling afterward or the following morning.
These are useful considerations, not a guarantee that your ankle is ready. A physical therapist can also assess hopping and other movements relevant to running when appropriate. The PAASS return-to-sport framework highlights pain, ankle function, confidence, balance, and sport-specific performance as important parts of the decision.
Seek professional guidance before returning if you have persistent symptoms, repeated sprains, or a severe or high ankle sprain.
Start With Short Running Intervals
Once you are ready to try running, build back gradually:
- Warm up with comfortable walking and gentle ankle movements.
- Alternate short, easy jogging intervals with walking on a flat, even surface. Keep the first session brief.
- Allow a recovery day between early running sessions so you can assess your ankle’s response.
- Increase running time gradually when the current level feels comfortable and does not worsen symptoms. Add speed, hills, and uneven terrain later.
Treat this as a flexible progression, following any individual advice from your clinician.

Check Your Ankle After Each Run
Stop the running session if you develop ankle pain, start limping, or feel the ankle giving way. Check again later that day and the next morning for increased swelling, pain, or stiffness.
If symptoms increase, pause running and return to a level of activity your ankle tolerates. Seek advice if symptoms persist or repeatedly return when you try to progress.
For practical tips on recognizing changes in how you feel and adjusting your training, read our guide to listening to your body when running.
Cross-Training While You Recover
Swimming or gentle stationary cycling may help you maintain fitness if your ankle tolerates them. These activities still involve the ankle, so choose an option that does not provoke symptoms during exercise or afterward. Elliptical training also requires weight-bearing and may need to wait until later in recovery.
Bracing and Continued Rehabilitation
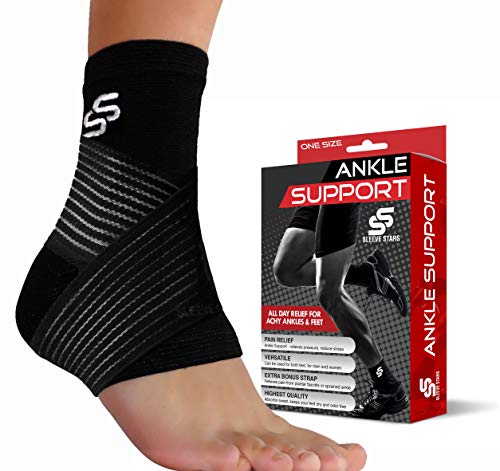
An ankle brace or taping may provide support during your return, particularly after previous sprains. Ask a physical therapist or athletic trainer whether either is appropriate and how to use it.
A brace does not replace rehabilitation or make a painful ankle ready for running. Continue the strength and balance exercises appropriate to your recovery stage. The American Academy of Orthopaedic Surgeons recommends progressive rehabilitation and notes that bracing or taping may help during an early return to sport.
Recovery isn’t just about returning to running; it’s about returning sustainably without further injury.
8. The Role of Footwear and Running Surfaces
Proper footwear and being mindful of running surfaces are key to preventing ankle sprains. Here’s how to protect your ankles:
Choosing Supportive Shoes
- Fit Matters: Wear shoes that fit well and provide ample ankle support. Shoes that are too loose can cause instability.
- Arch Support: Choose shoes that match your foot type. Whether you have flat feet or high arches, proper support is crucial for balance.
- Cushioning: Look for good shock absorption to reduce impact and strain on your ankles.
Being Aware of Running Surfaces
- Avoid Uneven Terrain: Running on uneven or rocky surfaces increases the risk of rolling your ankle. Stick to smooth trails or well-maintained roads.
- Change Surfaces Slowly: If transitioning from a treadmill to outdoor running, gradually adapt to new surfaces to avoid sudden stress on your ankles.
By wearing supportive shoes and being cautious on uneven surfaces, you can significantly reduce your risk of ankle sprains.
➤ Running Ankle Sprain Frequently Asked Questions
Avoid running on a newly sprained ankle, especially with pain, swelling, limping, or instability.
Return gradually after comfortable walking and recovery of ankle movement, strength, and balance. Monitor symptoms during activity and the following morning.
A brace may provide support, but it does not determine when you are ready to run. See section 7 for guidance on returning.
A Grade 1 ankle sprain is mild, but it still involves ligament damage. Avoid running while you have ankle pain, swelling, limping, or instability.
Before returning, you should be able to walk briskly without pain and have regained ankle movement, strength, and balance. Start with short, easy running intervals and monitor symptoms afterward and the next morning.
Readiness depends on your recovery, not simply a few days of rest. If you are unsure, ask a physical therapist or healthcare professional.
Most ankle sprains recover well with appropriate care and rehabilitation, but recovery time varies. Mild injuries may improve within a few weeks, while more severe sprains can take several months. Feeling better does not necessarily mean the ankle is ready for running. Many severe sprains also heal without surgery. Persistent pain, swelling, or repeated giving way should be assessed by a healthcare professional.
Elevate your ankle slightly using a pillow or blankets to reduce swelling while you sleep. You can also apply ice before bed to help reduce inflammation and pain.
1) Warm up thoroughly before any run.
2) Gradually increase running intensity and duration.
3) Wear shoes that match your foot type and offer proper support.
4) Replace worn-out running shoes promptly.
5) Avoid running on uneven surfaces or steep hills.
6) Strengthen your ankles with balance and mobility exercises.
7) Listen to your body and avoid overtraining.
That’s good to know that you should wear a brace for a while after an ankle sprain. I could see why you would want the extra support when you are still healing a bit. I’ll have to consider getting one of those to use if I ever sprain my ankle.
Never in my life have I thought about exercising my ankles but I suppose that’s why I have had some injuries. While hiking last summer I twisted my ankle and had a hard time recovering over the next couple of weeks. I’ll be sure to use your tips in the future if I hurt my ankle again and will probably visit a doctor as well.