Posted on 2 Comments

Don’t Let an Ankle Sprain Stop You From Running

An ankle sprain from running

Ankle sprains are an all-too-common injury, especially for runners. Many of us have experienced the pain and mistakenly believed that complete rest was the best solution. However, recovering from an ankle sprain takes more than waiting for the pain to fade.

An ankle sprain occurs when the foot twists suddenly, overstretching the ligaments. It’s the most frequent orthopedic injury, affecting around 20% of people, runners being even more prone to it. In fact, thousands of ankle sprains occur daily in the U.S., often sending runners to emergency rooms and even leading to orthopedic surgeries.

While not typically a severe injury, ankle sprains can have long-term effects. Up to 50% of people may not fully regain their previous level of function, and recurrent sprains can lead to chronic ankle instability.

Taking the right steps early in recovery is key to preventing chronic ankle instability and recurrent sprains.

Ankle sprains occur when the ligaments around the ankle joint are stretched or torn, usually as a result of sudden twists or turns. Depending on which ligaments are affected and how the injury occurs, ankle sprains can be categorized into different types:

  1. Inversion Sprain
    This is the most common type of ankle sprain, occurring when the foot rolls inward, causing the ankle’s outer ligaments (lateral ligaments) to stretch or tear. Runners are particularly prone to inversion sprains when running on uneven surfaces or if their foot lands awkwardly.
  2. Eversion Sprain
    An eversion sprain happens when the foot rolls outward, stretching or tearing the inner ligaments (deltoid ligament) of the ankle. Though less common than inversion sprains, eversion sprains tend to be more severe and take longer to heal.
  3. High Ankle Sprain (Syndesmotic Sprain)
    This type of sprain involves the ligaments that connect the two bones of the lower leg, the tibia and fibula, and is typically caused by a forceful twisting motion. High ankle sprains are less frequent but often more difficult to treat, requiring longer recovery times compared to inversion or eversion sprains.
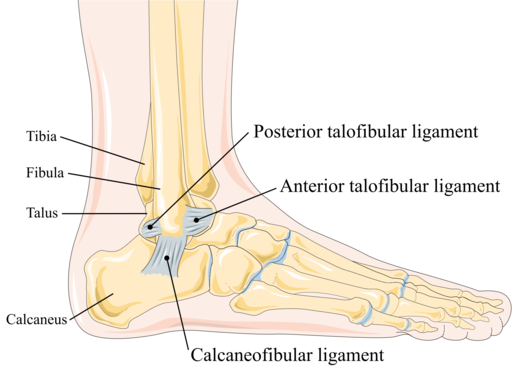
The lateral collateral ligament of the ankle joint, showing the anterior talofibular ligament, calcaneofibular ligament, and posterior talofibular ligament.
The lateral collateral ligament of the ankle joint.
Image credit: Wikimedia Commons

Each type of ankle sprain requires specific treatment and recovery protocols, so identifying the type of sprain is key to ensuring proper care and preventing further injury.

Ankle sprains are categorized into three grades based on their severity, ranging from mild ligament stretching to complete tears. These grades help determine the appropriate treatment and recovery plan.

Grade 1 – Mild Sprain

  • Slight overstretching of the ligaments.
  • Mild pain with minimal swelling and tenderness.
  • Slight difficulty with weight-bearing activities like walking or running.
  • Usually heals quickly with rest and light rehabilitation.

Grade 2 – Moderate Sprain

  • Partial tear of one or more ligaments, commonly the anterior talofibular ligament (ATFL).
  • Moderate pain, noticeable swelling, and some joint instability.
  • Bruising may occur around the ankle.
  • Difficulty walking or performing weight-bearing activities, requiring more extended recovery.

Grade 3 – Severe Sprain

  • Complete tear of the ligament, typically the anterior talofibular ligament.
  • Significant pain, swelling, and bruising.
  • Severe ankle instability, making it difficult or impossible to bear weight.
  • Often requires a longer rehabilitation period, and in some cases, surgery may be necessary.

📌 If you’re uncertain whether you have foot or ankle pain, use Mayo Clinic’s Foot or Ankle Pain Symptom Checker for guidance.


Disclaimer: This post is not medical advice and is not intended to provide diagnosis or treatment for any medical conditions. Please consult a physician or other health care professional for your specific health care and/or medical needs or concerns.


The most common sprain is a lateral ankle sprain, also known as rolling the ankle.


🔔 Before starting treatment, it’s important to seek professional medical attention if any of the following are present:

  • An open wound
  • Severe pain or intense swelling
  • Visible deformity of the ankle
  • Signs of infection include a fever over 100°F (37.8°C).
  • Inability to put weight on the injured leg

If you’re unsure whether the sprain is Grade 2 or 3, it’s better to consult a healthcare professional for proper diagnosis and treatment.


R.I.C.E. Guidelines For Ankle Sprains

In the first few days after an ankle sprain, follow the R.I.C.E. method to reduce pain and swelling:

  • Rest: Minimize walking or putting pressure on the injured ankle. Try to avoid bearing any weight on it, using crutches or a brace if necessary to fully offload the ankle and prevent further strain.
  • Ice: Apply ice three times a day for 20 minutes. Always use a barrier, like a cloth, between the ice and your skin.
  • Compression: Use an elastic bandage or compression ankle brace to reduce swelling and support the ankle. Make sure it’s snug but not too tight to maintain proper circulation.
  • Elevation: Raise the injured ankle above your heart to minimize swelling.
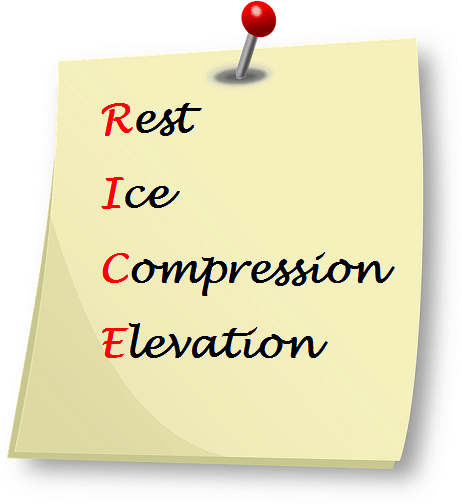
A yellow sticky note with the R.I.C.E guidelines for a sprained ankle: Rest, Ice, Compression, and Elevation, written in red font. The note is pinned with a red pushpin on a white background.
R.I.C.E guidelines for a sprained ankle

While the R.I.C.E. method helps in the immediate aftermath, ankle sprains need ongoing care to ensure a full recovery. Early treatment with active exercises is key to speeding up healing and reducing the risk of future sprains.

Active Exercises for Recovery

For Grade 1 or 2 sprains, starting gentle weight-bearing exercises after about 3 days can:

  • Reduce pain
  • Speed up recovery
  • Strengthen muscles and improve coordination
  • Lower the risk of recurrent ankle sprains

A good example is the Heel/Toe Raises exercise shown in the video below.

Standing Heel and Toe Raises | Physical Therapy Exercise | Video by Visiting Nurse Association Health Group

Though these exercises might seem uncomfortable, they play a crucial role in the healing process and should not be skipped. They improve ankle stability and overall function, leading to a quicker and safer return to activity.

While many ankle sprains can be managed with home care and self-treatment, there are situations where it’s crucial to consult a healthcare professional to ensure proper recovery and avoid complications.
Here are some red flags indicating that professional medical help is needed:

Severe or Persistent Pain

If you experience intense pain that doesn’t subside with rest, ice, and over-the-counter pain relief, it may be a sign of a more serious injury. Persistent pain could indicate a fracture or severe ligament damage that requires medical evaluation.

Significant Swelling

While some swelling is normal with an ankle sprain, excessive or rapidly increasing swelling can be a concern. If the swelling does not improve with elevation and compression, or if it seems disproportionate to the injury, a medical assessment is warranted.

Inability to Bear Weight

Difficulty or inability to put weight on the affected ankle, especially if it persists beyond the first 24-48 hours, suggests a more severe sprain or possible fracture. Seeking professional help is important to assess the extent of the injury and receive appropriate treatment.

Joint Instability or Loss of Range of Motion

If you feel that the ankle is unstable or if you experience a significant loss of range of motion, it could indicate serious ligament damage. A healthcare professional can provide a thorough examination and recommend appropriate rehabilitation strategies.

Signs of Infection

Symptoms such as redness, warmth, or fever around the injured area could signal an infection, especially if an open wound or the injury becomes increasingly painful. Immediate medical attention is necessary to address any potential infection.

Failure to Improve

Suppose you’ve been following standard self-care measures, such as rest, ice, and elevation, and you don’t see any improvement within a few days. In that case, it’s important to consult a healthcare professional. A delayed or improper healing process may require more specialized treatment.


Consulting a healthcare professional ensures that you receive an accurate diagnosis and an appropriate treatment plan tailored to your specific injury. Early intervention can help prevent complications and facilitate a more efficient recovery.

After about 3 days, depending on the severity of the sprain, it’s important to begin gentle exercises to aid recovery. Follow these steps to gradually regain strength and stability:

Key Guidelines for Exercise:

  • Perform within your pain threshold—avoid pushing too hard.
  • Start slow, just a few minutes each day.
  • Gradually increase difficulty: begin on both feet, progress to one leg, and eventually add an unstable surface like a cushion.

Step 1: Two-Legged Exercises

  1. Weight Shift: Shift your body weight from toes to heels and back.
  2. Pelvic Transfer: Move your weight side-to-side while shifting your pelvis.
  3. Heel/Toe Raises: Raise onto your toes and then back down onto your heels.
  4. Heel Transfer: Shift weight to your heels with your toes lifted.

Step 2: One-Legged Exercises

Make sure to practice on both legs, starting with the healthy one.

  1. Balance: Stand on one leg for 7-30 seconds. Repeat for 3 sets.
  2. Leg Swings: Swing your free leg back and forth 20 times while balancing.
  3. Toe Raises: Shift your weight while raising your toes 20 times.
  4. Balance on an Unstable Surface: Stand on a cushion or any unstable surface, and shift your weight to your heels while keeping your toes in the air.
URBNFit Balance Disc – Core Stability Wobble Cushion for Strengthening, Physical Therapy, Office Chairs, and Kids’ Classrooms – Sensory Wiggle Seat Pad
Standing on an unstable surface such as the URBNFit Balance Disc Wobble Cushion.

You can also increase difficulty by closing your eyes or practicing on a balance board for an added challenge.


Rehabilitation from an ankle sprain should be approached systematically, with a focus on gradually restoring mobility, strength, and balance. Here’s a clear step-by-step plan based on the severity of the sprain:

Early-Stage Rehab (Mobility Exercises, Light Stretches)

Objective: Restore ankle mobility and reduce stiffness while minimizing pain.

  1. Ankle Circles
    • How to Do It: Sit or lie down with your leg extended. Slowly rotate your foot in a circular motion, 10 times in each direction.
    • Frequency: Perform 2-3 sets, 2-3 times a day.
  2. Alphabet Exercise
    • How to Do It: Sit with your leg extended. Use your big toe to trace the letters of the alphabet in the air. This helps to improve the range of motion.
    • Frequency: Complete the alphabet once or twice, 2-3 times a day.
  3. Towel Stretch
    • How to Do It: Sit with your leg extended and loop a towel around the ball of your foot. Gently pull the towel towards you until you feel a stretch in your calf and Achilles tendon. Hold for 15-30 seconds.
    • Frequency: Perform 2-3 times, holding the stretch 2-3 times a day.
  4. Dorsiflexion Stretch
    • How to Do It: Sit on the floor with your legs extended. Flex your foot towards you by gently pulling on your toes. Hold the stretch for 15-30 seconds.
    • Frequency: Repeat 2-3 times, 2-3 times a day.

Mid-Stage Rehab (Strengthening Exercises)

Objective: Build strength in the ankle and lower leg to support recovery and prevent future injuries.

  1. Resistance Band Exercises
    • How to Do It: Sit with your leg extended. Loop a resistance band around the ball of your foot. Push your foot against the band (plantar flexion), hold for a few seconds, and then slowly return. Repeat 10-15 times.
    • Frequency: Perform 2-3 sets, 1-2 times a day.
  2. Calf Raises
    • How to Do It: Stand with your feet hip-width apart. Slowly raise your heels off the ground, balancing on the balls of your feet. Lower back down slowly. Repeat 15-20 times.
    • Frequency: Complete 2-3 sets, 1-2 times a day.
  3. Toe Taps
    • How to Do It: Sit with your leg extended. Tap your toes up and down against the floor or a wall. Repeat 15-20 times.
    • Frequency: Perform 2-3 sets, 1-2 times a day.
  4. Heel Walks
    • How to Do It: Walk on your heels for 30-60 seconds, keeping your toes off the ground. This helps strengthen the front of the lower leg.
    • Frequency: Complete 2-3 sets, 1-2 times a day.

Late-Stage Rehab (Balance and Proprioception Exercises)

Objective: Improve balance, proprioception, and agility to return to running safely and prevent re-injury.

  1. Single-Leg Balance
    • How to Do It: Stand on one leg, aiming to balance for 30-60 seconds. Progress to doing this on an unstable surface, such as a BOSU ball or balance pad.
    • Frequency: Perform 2-3 sets, 1-2 times a day.
  2. Wobble Board Exercises
    • How to Do It: Stand on a wobble board or balance disc. Try to maintain balance and perform gentle movements to engage ankle stabilizers. Start with basic balancing and progress to more challenging exercises.
    • Frequency: Perform 2-3 sets, 1-2 times a day.
  3. Agility Drills
    • How to Do It: Incorporate agility drills such as ladder drills, cone drills, or side shuffles. Focus on quick changes in direction and maintaining balance.
    • Frequency: Include 1-2 agility sessions per week.
  4. Dynamic Balance Exercises
    • How to Do It: Perform exercises like standing on one leg while moving your other leg forward and backward or side to side. This mimics the dynamic movements of running and helps improve proprioception.
    • Frequency: Complete 2-3 sets, 1-2 times a day.

If that feels too easy, try performing the exercise on a cushion or another unstable surface for added challenge.

Standing with one leg on Balance Board
Standing with one leg on a Balance Board

By following this structured rehabilitation plan, you can effectively manage your recovery from an ankle sprain, gradually restoring strength, mobility, and balance to return to running safely.

Check out this video for more guidance on ankle sprain exercises:

How To Strengthen Your Ankles At Home [INJURY-PROOF ANKLES!] by Tone and Tighten (09:04)

When you’re ready to start running again, using an ankle brace during your runs can provide extra support and help reduce the risk of re-injury.

Warm-up

Before any run, a proper warm-up is crucial to prevent injuries. Focus on dynamic stretches that get your joints moving and blood flowing to the ankle.

How To Warm Up Properly Before a Run In 3 Steps to Avoid Running Injuries and Improve Your Running Performance

Gradual Return to Running

Ease back into running gradually. Start with slow walking, then slowly pick up the pace as your ankle allows. Once you’re comfortable, introduce short running intervals, alternating with walking or slow jogging.

Recovery takes time, often several weeks or months, so be patient and listen to your body. Never push through pain or discomfort. If you notice pain, swelling, or instability, stop immediately and consult a healthcare professional.

Finally, keep up with ankle strengthening and stretching exercises to ensure continued improvement in stability and flexibility.

Cross-Training

While you’re easing back into running, consider incorporating low-impact activities like swimming, cycling, or elliptical training. These exercises keep your cardiovascular fitness up without putting stress on your ankle, helping you stay in shape during recovery.

Ankle Bracing and Taping

In addition to an ankle brace, you can also consider ankle taping for added stability during the early stages of your return to running. Speak with a physical therapist or athletic trainer to learn proper taping techniques or decide if an ankle brace would be more beneficial for your specific situation.

Sleeve Stars Ankle Brace Achilles Tendonitis Support, Ankle Support Football Compression Sleeve w/ Strap, Heel Support for Plantar Fasciitis & Pain, Foot Strap for Men & Women

Listen to Your Body

It’s tempting to return to your usual running mileage or speed but pay attention to how your ankle feels after each session. If you experience any recurring pain or stiffness after a run, give yourself additional rest and adjust your training load accordingly.

Recovery isn’t just about returning to running, it’s about returning sustainably without further injury.


Proper footwear and being mindful of running surfaces are key to preventing ankle sprains. Here’s how to protect your ankles:

Choosing Supportive Shoes

  • Fit Matters: Wear shoes that fit well and provide ample ankle support. Shoes that are too loose can cause instability.
  • Arch Support: Choose shoes that match your foot type. whether you have flat feet or high arches, proper support is crucial for balance.
  • Cushioning: Look for good shock absorption to reduce impact and strain on your ankles.

Being Aware of Running Surfaces

  • Avoid Uneven Terrain: Running on uneven or rocky surfaces increases the risk of rolling your ankle. Stick to smooth trails or well-maintained roads.
  • Change Surfaces Slowly: If transitioning from a treadmill to outdoor running, gradually adapt to new surfaces to avoid sudden stress on your ankles.

By wearing supportive shoes and being cautious on uneven surfaces, you can significantly reduce your risk of ankle sprains.

Can I run with a sprained ankle?

Running on a sprained ankle is possible only under certain conditions.
It depends on the severity of the sprain. You should only consider running when you’re mostly pain-free, have a full range of motion, and the strength in your injured ankle matches your uninjured one. For a mild sprain, using a protective brace can allow you to return to running within a couple of weeks.


Is it safe to run on a Grade 1 ankle sprain?

Yes, you can often run on a Grade 1 sprain, which involves a mild stretch of the ligaments. You may experience some discomfort and swelling, but recovery is typically quick, usually within a few days. However, listen to your body and avoid pushing too hard.


Do sprained ankles fully heal?

Most sprained ankles, especially mild (Grade 1) and moderate (Grade 2) sprains, heal within 3-6 weeks. However, some sprains can cause long-term issues if not properly treated. Severe sprains (Grade 3), which involve torn ligaments, may require surgery and longer recovery.


How should I sleep with a sprained ankle?

Elevate your ankle slightly using a pillow or blankets to reduce swelling while you sleep. You can also apply ice before bed to help reduce inflammation and pain.


What’s the best way to prevent ankle sprains while running?

1) Warm up thoroughly before any run.
2) Gradually increase running intensity and duration.
3) Wear shoes that match your foot type and offer proper support.
4) Replace worn-out running shoes promptly.
5) Avoid running on uneven surfaces or steep hills.
6) Strengthen your ankles with balance and mobility exercises.
7) Listen to your body and avoid overtraining.


Posted on Leave a comment

Warm-up Before Running Is Essential, So You Better Do It Right

Warm-up before running

Do you wear your running shoes, get out, and start running without a warm-up?
So, don’t be surprised when running injuries will occur.

When the muscles are cold and the joints are stiff, intense training can endanger the muscles and expose us to unnecessary injuries.

Before running a half marathon or just jogging in the neighborhood, a proper running warm-up is essential for avoiding injuries. Additionally, a proper warm-up can improve your running performance.
Another important part of the warmup is getting in the right mindset.

3 Things That Warm-up Does:

  1. It prepares our bodies for running. Warming up the muscles by circulating our blood. The heart rate gently rises, and the breathing also gently increases. By the time you’re ready for your faster-paced running, your body is up to speed, and it’s not so much of a shock.
  2. A warm-up builds and reinforces the communication pathways between the brain and the muscles. These are called neuromuscular connections. Neuromuscular training is about stimulating the brain’s communication with the muscles. It improves running form efficiency, economy, power, stride length and frequency, ultimately fatigue, and resistance.
  3. A good warmup routine prepares you mentally for what you’re about to do before a race or an intense workout.
    One of the best ways to ease the negative mental energy is by channeling your focus into a routine that you’ve done a million times before.

However, doing a warm-up that includes only a mile or two of easy jogging is not enough.
A proper warm-up should be done correctly and include the following 3 steps:

1) Dynamic warm-up to lubricate the joints
2) Technique exercises
3) Walking/Easy running

Step 1 – Dynamic Warm-up to Lubricate The Joints

We need to lubricate our joints to make our run smoother and lower our chance of injury. So it is highly recommended to move all the joints in the body when starting the warm-up.
We focus on the entire body and move each joint and joint, first with linear movements and then with rotations.
This activity prevents muscle cramps in the back, neck, shoulders, and so on.
It reduces the risk of injuries to the joints, such as ankle sprain, and improves the quality of the body’s movement.

Following are a few drills that can be done at this part of the warm-up, starting from the neck to the ankles.
These drills should be repeated 8 to 12 times.

  • Neck – While standing, move your neck slowly down to the chest and then rotate the neck to the right and then to the left.
  • Arms – Circle your arms forward several times and then backward.
  • Shoulders – Stand straight and roll your shoulders back.
  • Upper body twists – Look forward while standing, and twist your upper body from right to left.
  • Hips – Stand on the left leg while the right leg knee is up to 90 degrees, and do circles to the right with your right leg. Switch legs after several times.
    Hold a chair or a friend nearby if you feel unsteady standing on one leg.
  • Knee Circles – Stand straight with your knees slightly bent and with your feet together. Place the hands on the knees and draw a circle with your knees to the right, after several times circle the knees to the left.
    Pay attention to keeping your feet flat on the ground.
  • Ankles – Start with plantar flexion, which means pointing your toes to the ground while the heel is up. After that, do ankle dorsiflexion, which means bending your ankle toward the shin(toes up, heel down). Switch legs after several times.

The following video shows how to warm up your knees and ankle joints:


Joint Warm-up | Yoga for Runners | by Gaiam (01:07)


However, you should avoid doing static stretches during the running warm-up, as this can lead to injuries.


Step 2 – Technique Exercises

Before running, it is recommended to perform a short four to five minutes of workout, that includes running technique exercises mainly for the legs.

For example, the following video shows five drills for a warm-up and running technique improvement.
Perform each drill for about 20 to 30 seconds.

  • 1. High Knees – Run slowly with short strides while lifting your knees up to waist level. Land on the forefront of your feet and not on the heels.
  • 2. Butt Kicks – Jog slowly while bringing one heel off the floor towards your glutes as possible. Move the opposite arm when running.
  • 3. Skips – Skip with high knees, extend the keg forward, and bring your leg down. Try to move forward as quickly as possible. The foot should be slightly flexed, which means the toes are drawn up towards your shin. Move your arms as if you were running.
  • 4. Grapevine – This drill is fun, step to the right side while the left leg is crossed behind the right foot.
    After that, step to the right again with the right foot and bring the left foot in front of the right leg.
    After a few steps, repeat the move while now the left leg leads.
  • 5. Bounds – Jog slowly with an exaggerated running stride, step forward with your left leg, driving your right knee up to the waist. Freeze the move for one second and land softly on your right forefoot. Repeat the move while your right leg leads.
5 Simple Drills to Improve Running Technique and Warm Up Your Body | by ENDURANCEWORKS School of Tri (04:23)


When running in cold weather, it is recommended to do this part of warm-up inside a building and not outside.


Step 3 – Walking or Easy Running

These light cardio exercises are the most essential part of the warm-up. You should never start running at high intensity while the muscles are cold and stiff. Intensive training without this cardio part of the warm-up can endanger our muscles and expose us to unnecessary injuries.

Walking and then easy running raises the body’s temperature and enhances the blood flow to the muscles, so they will be ready for the running.

Before any intensive running (intervals, tempo, fartlek, etc.), it is essential to run at least half a mile slowly, and after that gradually increase the pace.

Beginner runners can start walking and later on increase to a brisk pace and then jog.

This part of the warm-up is also needed for the heart. Our hearts do not like sharp changes and quick transitions from resting to intensive training.


Now, after we did a proper warm-up, we can enjoy our running!

Warm-up before running includes 3 steps: 1) Dynamic warm-up to lubricate the joints 2) Technique exercises 3) Walking/Easy running
The 3 Steps of Warm-up Before Running

Warm-up Duration and Intensity

However, the warm-up duration should not be too long and intensive. This can make us feel exhausted, and reduce our ability to perform well in the workout/race.

The warm-up duration rule is:
the longer the running distance, the shorter the warm-up should be.

On race day, the duration of your warm-up will have an inverse relation to the length of your race. For example, if you’re racing one mile, you’ll want to have a much longer warm-up with dynamic and speed drills to make sure you are ready for peak performance.

But before a marathon, you don’t want to spend too much time on speed drills and waste too much of your precious energy. So, for races between 5k to the half marathon, you need a 10 to 20 minutes jog, few dynamic drills, and maybe a few strides to make sure you are ready.


Warm-up Before Running Frequently Asked Questions:

Is it necessary to warm up before running?

Yes, it is, by completing a proper and an active warm-up before you begin the important part of your running, your body raises the temperature in your muscles, thus causing your body temperature to rise. This is essential for avoiding injuries, and also can improve your running performance.

How long before a race should you warm-up?

Most experts agree that runners should not wait longer than 10 minutes between their warm-up and race start time unless the runners risk losing some of the benefits of the warm-up.

What stretches to do before a run?

1) During the warm-up, DO NOT stretch cold muscles.
2) You can stretch lightly before intense running, after 10 minutes of the warm-up easy running part.
3) Ease into each stretch and don’t bounce or force it.
4) Before intense running, hold each stretch for 10-15 seconds.
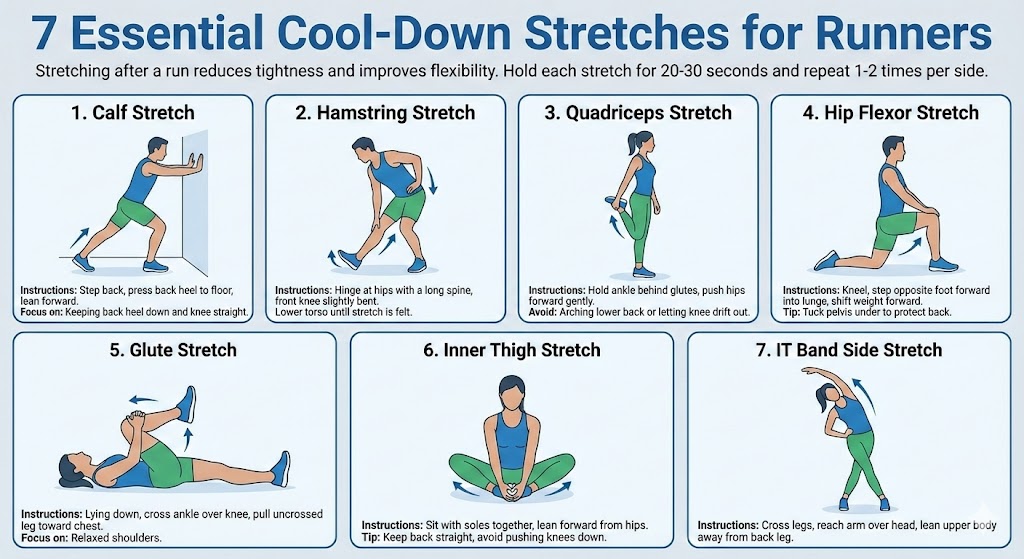
5) The stretches should be part of the cool-down after a run. You should include at least a Hamstring Stretch and a Standing/ Lying Quad Stretch. Remember to stretch also the upper body and not only the legs.
stretch cool down after a run

What is a dynamic warm-up?

The purpose of the dynamic warm-up before a run is to increase blood flow to the areas that will be working and to wake up the nervous system throughout the body. The dynamic warm-up should include:
1) 4 to 5 minutes of running technique exercises mainly for the legs.
2) Brisk walk and/or easy run for raising the body’s temperature and enhancing the blood flow to the muscles.


Posted on Leave a comment

Ketosis Symptoms and Signs: What to Look Out For

Ketosis Symptoms and Signs

The article “Ketosis Symptoms and Signs: What to Look Out For” was originally published at HVMN by Nate Martins.


There are two paths to achieve ketosis.

The first is through the ketogenic diet or fasting, which can take weeks or months for the body to produce its own ketones.
The second is through exogenous ketones like HVMN Ketone, consuming ketones through an external source. On the map to ketosis, these are different roads–one more winding than the other.

But how do you know you’ve arrived at ketosis?
What positive things are you looking for?
What negative symptoms might you encounter?
Here, we discuss what signposts to monitor your ketosis.

Ketosis is a normal metabolic state marked by higher-than-normal levels of ketones (or ketone bodies) in the blood.

Endogenous ketone production denotes ketones produced naturally by the body. It’s the body’s natural adjustment to the absence or restriction of carbohydrates in the diet. Without enough glucose from carbs to fuel its cells, the body turns to fat to replace glucose as its primary source of energy.

In the liver, fat that is not burned for energy directly is converted to ketones. And, this means that you are in a ketogenic state.
Ketone levels increase in the bloodstream and provide an alternate and efficient fuel source for the body and brain. As a result, muscle protein is spared from being converted to glucose for energy.

Exogenous ketosis comes from an external source. Consuming exogenous ketones, like a ketone drink containing a ketone ester or a ketone salt, raises blood ketone levels. The body isn’t producing ketones in this state but remains in ketosis from having ketones introduced from an outside source. However, the body isn’t ketogenic–that specifically means the body is producing its own ketones.

Two paths, one destination. Here’s what to look out for to ensure you’re in ketosis.

A device for measuring ketosis determines the presence of ketones in breath, blood, and urine, providing an exact biomarker of your level of ketosis.

A blood ketone level of 0.5 mmol/L is widely acknowledged as the threshold for entering ketosis. Using a measuring device is the best way to know you’re in ketosis, with different devices measuring the presence of ketones in the breath, blood, and urine, to provide an exact biomarker of your level of ketosis.

Measuring ketosis through blood is the most accurate. Blood testing is reliable for quantifying both endogenous (created by the ketogenic diet, fasting, and exercise) ketones and exogenous ketones such as HVMN Ketone. Urine and breath measurements are less reliable but can be useful as quick, noninvasive ways to approximate blood ketone levels.

The ketogenic diet remains the most common approach to trigger a state of ketosis. Low in carbs, high in fat, and low/moderate in protein, carbohydrates are typically reduced to less than 50 grams per day. It’s this depletion of carbs that results in the body becoming ketogenic.

Along with biomarker testing, subjective symptoms can provide an indication of your ketosis. Sometimes, early side effects of the diet result from carbohydrate withdrawal. This can be known as the “keto flu;” symptoms include nausea, fatigue, and headache. and dry mouth. They’re short-term, typically lasting about a week or less. Keep in mind, however, that we are all different. Our bodies react in different ways. Some of us may experience these symptoms later than sooner, to a lesser extent, or not at all.

Let’s dive into some of the other potential side effects of ketosis.

Troublesome Keto Diet Symptoms: Gut Issus, Headache and Nausea, Bad Breath

Gut Issues: Frequent Urination, Constipation, Diarrhea 

Glycogen is the body’s stored form of carbohydrate for energy. It’s found primarily in the liver and muscle cells. Each gram of glycogen is bound with 3 to 4 grams of water. On a low-carb diet, the body will burn through these glycogen stores, releasing a lot of water and causing frequent urination.

As insulin levels plummet from carb-cutting, more water is flushed out, along with excess sodium (in contrast, excess insulin from carbs causes sodium and water retention). In some people, dehydration contributes to constipation, which can also result from avoiding fiber-rich carbohydrate foods. While less common, diarrhea or loose bowels can be triggered by several factors including too much or too little fat, dairy intolerance, or changes in gut flora. 

Many people on the ketogenic diet never experience gut problems. Those who do can try combating them by drinking plenty of water and mineral-rich broths and eating more non-starchy veggies along with foods rich in fat and fiber (such as nuts, nut butter, and avocado).

Rapid Weight Loss/Long-term Weight Loss

As glycogen stores become depleted and water attached to glycogen is released, rapid weight loss in the form of “water weight” occurs.

Once glycogen stores run out, however, ketosis kicks in as body fat is burned. Strong evidence supports the use of ketogenic diets for long-term weight loss. The appetite-suppressant impacts of ketosis leading to decreased calorie consumption are considered to be the most plausible mechanism through which the diet works. 

Bad Breath

Surprisingly, low-carb diets may lead to bad breath (also called ketosis breath).

Acetone, the least abundant ketone, is present in the breath and is responsible for the unpleasant odor. Acetone is a solvent in nail polish if that gives you an idea of what it might smell like. But it’s not as bad as it sounds; acetone breath is a sign of ketosis and fat burning. It’s the ketone measured in breath tests used for detecting ketosis.

After several weeks of keto dieting, ketosis breath typically dissipates. To help, drink more water and use breath fresheners. If it’s unbearable, consider adding just enough carb back into your diet to avoid bad breath while still staying in the ketosis zone.

The positives of ketosis greatly outweigh the negatives when reaching a state of ketosis. Lowering carbohydrate intake is responsible for some of the side effects of the diet, but is also responsible for the positive effects (from the presence of ketones).

Welcome Sign of Ketosis: Increased Mental Focus & Decreased Brain Fog, Decreased Appetite

Increased Mental Focus & Decreased Brain Fog

Studies have shown ketones can improve cognitive performance. The brain uses ketones as a fuel source when carbohydrates are depleted. Beta-hydroxybutyrate (BHB), the major ketone body, is more efficient than glucose. It also stimulates the production of new mitochondria – the energy factories in our cells.

Increased mental clarity and focus, and less brain fog are often reported by healthy people in ketosis. HVMN CEO, Geoffrey Woo said, “After a drink of HVMN Ketone, it’s like I’m more behind my eyeballs.” Exogenous ketones can subjectively improve mental performance and clarity.

When HVMN Ketone was tested in mice, they performed 38% better on a maze solving challenge, so there may be a cognitive boost for humans also. While following a ketogenic diet, you avoid the energy peaks and troughs that come from quick-energy carbs. Producing ketones from stored body fat provides the brain with a steady, sustainable supply of fuel.

Decreased Appetite

One of the first symptoms you might notice when on a ketogenic diet is that it kills your appetite.

People on the diet report being significantly more full and satisfied. Even though you may be ingesting fewer calories on the diet, your hunger doesn’t increase. One possible explanation is greater consumption of satiating foods, primarily protein, and fat. However, multiple studies indicate that the state of ketosis itself (apart from effects from food) plays a role as well.

High levels of circulating ketones may have a direct appetite-suppressant effect. In fact, the exogenous ketone ester used in HVMN Ketone rapidly increased blood levels of beta-hydroxybutyrate and lowered appetite as well as levels of ghrelin – the hormone that increases hunger. While this still needs to be explored further, it is possible that exogenous ketones may be useful for appetite control as part of a holistic weight loss strategy. 

In nondiabetics, ketosis (also called nutritional ketosis) is regulated and controlled in the body so that ketone levels never reach the harmful levels associated with diabetic ketoacidosis. Ketoacidosis is an acute, life-threatening condition that occurs in severely uncontrolled diabetes (mainly type 1) when ketones rise to massive, supranormal levels.

Since the body’s acid-base buffering system cannot neutralize the vast amount of acidic ketones, the blood pH drops significantly. This buildup of acids in the blood poisons the body and can lead to ketoacidosis. Breathing becomes deep and rapid as the body attempts to compensate for excessive acids. Other symptoms of diabetic ketoacidosis include:

  • Extremely high glucose levels
  • Nausea and vomiting
  • High levels of both glucose and ketones in the urine
  • This can lead to a coma

Importantly, this dangerous condition is rare in non-diabetics following a ketogenic diet, and in people taking exogenous ketones. Sticking to the recommended dose of max. 3 drinks per day of HVMN Ketone, there is no risk of ketoacidosis. 

Ketosis is the body’s normal physiological response to a shortage of carbohydrate fuel.

It is characterized by elevated blood levels of ketone bodies or ketones. Ketosis is a healthy, natural state that shouldn’t be confused with ketoacidosis, a dangerous and potentially life-threatening complication of diabetes.

Elevated blood ketone levels are the sign of ketosis, while certain subjective symptoms can also signal ketosis. Increased mental clarity, less brain fog, and diminished appetite are fairly common among people in ketosis.
The ketogenic diet specifically has its own assortment of symptoms. Fortunately, the negative symptoms such as constipation, diarrhea, and bad breath are often temporary and tend to fade as your body becomes better at fat-burning and naturally producing ketones. The positive symptoms of ketosis coincide with higher levels of ketones in the blood. This may occur after several weeks of adhering to the ketogenic diet or very shortly after ingesting exogenous ketones.

Scientific Citation

1. Paoli A, Rubini A, Volek JS, Grimaldi KA. Beyond weight loss: a review of the therapeutic uses of very-low-carbohydrate (ketogenic) diets. European Journal of Clinical Nutrition. 2013;67(8):789-796. doi:10.1038/ejcn.2013.116.
2. Stubbs, B.Cox, P.; Evans, R.; Santer, P.; Miller, J.; Faull, O.; Magor-Elliott, S.; Hiyama, S.; Stirling, M.; Clarke, K. (2017). On the metabolism of exogenous ketones in humans. Front. Physiol.
3. Olsson, K.-E. and Saltin, B. (1970), Variation in Total Body Water with Muscle Glycogen Changes in Man. Acta Physiologica Scandinavica, 80: 11–18. doi: 10.1111/j.1748-1716.1970.tb04764.x
4. DeFronzo RA, Cooke CR, Andres R, Faloona GR, Davis PJ. The effect of insulin on renal handling of sodium, potassium, calcium, and phosphate in man. Journal of Clinical Investigation. 1975;55(4):845-855.
5. Paoli, A., Bianco, A., Grimaldi, K.A., Lodi, A., and Bosco, G. (2013). Long term successful weight loss with a combination biphasic ketogenic Mediterranean diet and Mediterranean diet maintenance protocol. Nutrients 5, 5205-17.
6. Musa-Veloso, K., Likhodii, S.S., and Cunnane, S.C. (2002). Breath acetone is a reliable indicator of ketosis in adults consuming ketogenic meals. Am J Clin Nutr 76, 65-70.
7. Evans M, Patchett E, Nally R, Kearns R, Larney M, Egan B. Effect of acute ingestion of β-hydroxybutyrate salts on the response to graded exercise in trained cyclists. Eur J Sport Sci. 2018:1-11.
8. White H, Venkatesh B. Clinical review: Ketones and brain injury. Critical Care. 2011;15(2):219. doi:10.1186/cc10020.
9. Murray, A.J., Knight, N.S., Cole, M.A., Cochlin, L.E., Carter, E., Tchabanenko, K., Pichulik, T., Gulston, M.K., Atherton, H.J., Schroeder, M.A., et al. (2016). Novel ketone diet enhances physical and cognitive performance. FASEB J.
10. Gibson, A.A., Seimon, R.V., Lee, C.M., Ayre, J., Franklin, J., Markovic, T.P., Caterson, I.D., and Sainsbury, A. (2015). Do ketogenic diets really suppress appetite? A systematic review and meta-analysis. Obes. Rev. 16, 64-76.
11. Stubbs BJ, Cox PJ, Evans RD, Cyranka M, Clarke K, De wet H. A Ketone Ester Drink Lowers Human Ghrelin and Appetite. Obesity (Silver Spring). 2018;26(2):269-273.
12. Manninen AH. Metabolic Effects of the Very-Low-Carbohydrate Diets: Misunderstood “Villains” of Human Metabolism. Journal of the International Society of Sports Nutrition. 2004;1(2):7-11. doi:10.1186/1550-2783-1-2-7.

How do you know when your body is in Ketosis?

People in Ketosis often report tiredness, brain fog, and feeling sick when first starting a very low-carb diet. The good signs reported when getting used to the ketogenic state are Increased Mental Focus, Decreased Brain Fog, and Decreased Appetite.
However, Ketosis is a normal metabolic state marked by higher-than-normal levels of ketones (or ketone bodies) in the blood. Therefore the best way to know that you are in Ketosis is to use a ketone meter measuring device which provides an exact biomarker of your level of ketosis.

How long does it take for the body to go into ketosis?

It typically takes 2 to 4 days to enter ketosis if you eat fewer than 50 grams of carbs per day. However, for some people, it may take longer depending on factors like physical activity level, age, metabolism, carb, fat, and protein intake.

How long does Keto Flu last?

The keto flu, aka carb withdrawal, generally kicks in at the 24 to 48-hour mark. The keto flu symptoms typically last from a few days to two weeks, and up to a month at most.

What does Keto Breath smell like?

Keto breath produces a distinct taste or odor in the mouth that’s different from ordinary halitosis or bad breath. Some people describe keto breath as having a metallic taste. In addition to a funny taste in the mouth, keto breath can be fruity-smelling or have a strong odor that’s similar to nail polish remover.

Does exercise speed up ketosis?

Fitness exercise helps burn off glycogen and therefore speeds up your metabolism getting you into ketosis faster. This is because once glycogen stores run out, ketosis kicks in as body fat is burned.

Posted on 5 Comments

Top 10 Expert Tips to Prevent Running Injuries and Stay Injury-Free

Alt text: "A woman crouching down on a city street, holding her right ankle in pain, dressed in athletic gear after a possible running injury. This image reflects the theme of the article 'Top 10 Expert Tips to Prevent Running Injuries and Stay Injury-Free,' focusing on the importance of preventing common running injuries."

To prevent running injuries, it’s essential to focus not only on your running routine but also on what you do before, after, and in your everyday habits. By making smart choices, like proper warm-ups, cool-downs, and strength training, you can stay injury-free and keep progressing toward your running goals.
We’ve compiled the top expert tips to help you prevent running injuries and maintain consistent training without frustrating setbacks.

Pain is your body’s signaling that something might be wrong, often caused by overtraining, stress, or an unsuitable training program. Ignoring these early signs can lead to more serious injuries. Instead of pushing through the pain, consider adjusting or temporarily stepping away from your current routine.

In the early stages of discomfort, opt for shorter, easier runs as active recovery. This allows your body to heal while staying active.

It’s equally important to listen to your body during your runs. If you feel an unfamiliar pain or notice an unusually high heart rate, slow down or stop to prevent further injury. Consider using a heart rate monitor to track your pulse and stay within safe limits for better monitoring.

Runner standing with earphones connected to a phone in an armband, having stopped her run after feeling an unfamiliar pain, highlighting the importance of listening to your body to prevent injuries.

Wearing uncomfortable running shoes can easily lead to injury, but comfort alone doesn’t guarantee injury prevention. The right pair of shoes can help alleviate pain and reduce injury risk by supporting proper running mechanics.

Different shoes can influence how you run by affecting your foot strike, stride length, and overall form. To avoid injuries, it’s important to choose shoes that match your foot anatomy and running style.
Here are some important tips for selecting the right running shoes:

Road vs. Trail Running Shoes:

If you run on uneven, rocky terrain, opt for trail running shoes, which provide the extra support and grip needed for off-road running.

Foot Type & Pronation:

  1. Neutral Shoes: Most runners can benefit from neutral shoes, designed for those with a normal foot structure and minimal pronation.
  2. Support Shoes: If you have moderate pronation (the inward roll of the foot when it strikes the ground), look for shoes with added support to prevent injury.
  3. Motion Control Shoes: For runners with severe pronation or flat feet, motion control shoes offer the extra stability needed to maintain proper posture and reduce injury risk.

Shoe Size:

Running shoes should generally be one size larger than your everyday shoes to accommodate foot swelling during runs.

Mileage Matters:

Just like car tires, running shoes wear out over time. The recommended mileage for most running shoes is between 300 to 500 miles (or 480 to 800 kilometers), depending on factors like shoe quality, running surface, and your running style.
Don’t exceed this range, and avoid running in old shoes, even if they hold sentimental value, as worn-out shoes increase the risk of injury.

Lastly, when transitioning to a new type of running shoe, make the switch gradually to give your body time to adjust and avoid injuries.


For more tips on selecting the best running shoes, check out our guide: What to Look for When Buying Running Shoes.

Runner holding running shoes: How to Choose the Right Shoes for Your Feet and Running Activity

Overtraining is a primary cause of injuries and burnout among runners. To prevent minor discomfort from escalating into serious injuries, it’s essential to cut back on your overall mileage by 40% to 60% every fourth week. This recovery period not only helps to alleviate any emerging issues but can also enhance your performance in the long run.

During these “recovery weeks,” don’t worry about losing fitness; instead, consider incorporating cross-training activities to maintain your aerobic fitness. For more information on effective cross-training options, check out the article by Peloton: The Runner’s Guide to Cross Training.

Boost Your Running Performance: Prevent Injuries with the Down Week Rule.

Recognizing Overtraining

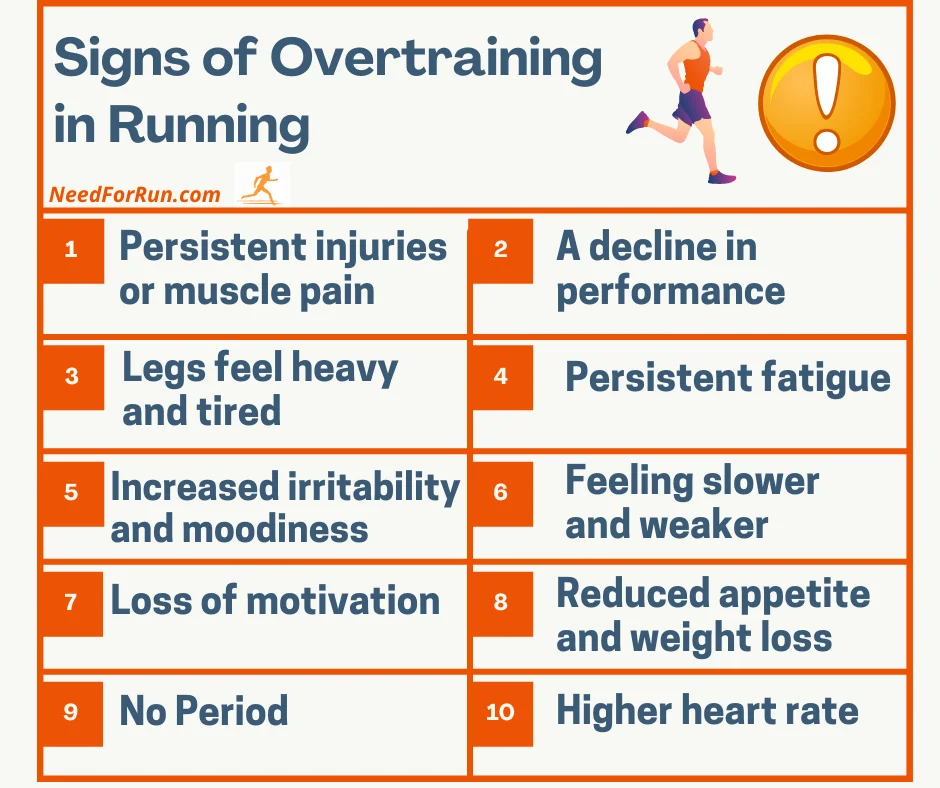
It’s important to be aware of the signs of overtraining. Here are 10 common symptoms to watch for:

  1. Persistent injuries or muscle pain
  2. Decline in performance
  3. Legs feeling heavy and fatigued
  4. Ongoing fatigue
  5. Increased irritability and mood swings
  6. Feeling slower and weaker
  7. Loss of motivation
  8. Reduced appetite and unintentional weight loss
  9. Irregular menstrual cycles
  10. Elevated resting heart rate

If you experience several of these symptoms, it may be time to adjust your training plan and prioritize recovery to prevent injuries and maintain your running progress.

10 symptoms of of overtraining in running

Proper running technique is essential not only for enhancing your performance but also for preventing injuries. While there’s ongoing debate about whether a single correct running technique exists or if it varies by individual, most experts agree on the following guidelines:

  • Posture: Lean slightly forward from your ankles while maintaining a neutral spine. This position helps create a more efficient running form.
  • Hip Engagement: Run from your hips and drive forward with your knees. This encourages powerful strides and reduces unnecessary strain on your legs.
  • Upper Body Position:
    • Keep your upper torso upright and your head up, with your eyes focused ahead.
    • Relax your shoulders and pull them slightly back to promote good posture.
    • Swing your arms naturally, keeping your elbows bent at about 90 degrees and close to your body to maintain balance and momentum.
  • Foot Strike: While many runners, including elite athletes, are heel strikers, it’s advisable to aim for a forefoot or midfoot landing. This technique helps reduce stress on your joints and can lead to a more efficient stride.

By incorporating these guidelines into your running technique, you can improve your performance while minimizing the risk of injury.

The video below by Salming Running effectively demonstrates the principles of proper running technique.

SALMING RUNNING WHEEL | by Salming Running ( (02:57)

Always be mindful of the surface you’re running on, as uneven terrain can lead to injuries like twisted ankles or falls. This is especially important in trail running, where bumps, holes, and stones are common hazards. Stay alert to avoid tripping or stumbling.

When running on steep or rocky terrain, avoid unnecessary risks, particularly on slopes or when climbing over loose rocks. It’s better to slow down and proceed with caution than to risk injury.

Even when running on roads or in urban areas, terrain awareness is crucial. Be on the lookout for obstacles like vehicles, cyclists, and other hazards, and always take extra care when crossing roads. Staying alert helps you prevent accidents and ensures a safer run.

Proper nutrition plays a critical role in supporting your running performance and preventing injuries.

Hydration Guidelines:

  • Before your run: Stay hydrated by drinking 16-20 ounces of fluids about two hours before a workout or race, and 8-10 ounces just before warming up.
  • During your run: Sip 6-8 ounces of fluids every 20 minutes, and drink more if you feel thirsty—but avoid overhydration.
  • For long-distance runs: It’s important to maintain glycogen levels in your muscles. Use energy gels or similar alternatives to keep your energy up during extended workouts or races.
  • After your run: Replenish lost fluids by drinking 20-24 ounces of fluid for every pound of body weight lost during the run.

Fuel Your Body:

To avoid dehydration and heat exhaustion, it’s ideal to drink 4-8% carbohydrate drinks before, during, and after your runs. These drinks help replenish glycogen in your muscles and aid recovery. For long runs, energy gels or other quick sources of carbohydrates can keep your energy levels up and help sustain performance.

Essential Nutrients:

Magnesium is a key mineral that supports over 300 biochemical reactions in your body, including muscle recovery, metabolism, and relaxation. Magnesium is especially important for runners, yet many people are deficient. Focus on eating magnesium-rich foods such as leafy greens, nuts, and seeds, or consider supplements. Runners can safely consume up to 800mg of magnesium per day to promote recovery and prevent cramps.

Nutrition for Runners - A display of magnesium-rich foods, including leafy greens, chickpeas, fish, nuts, quinoa, whole grains, and dark chocolate muffins, promoting muscle recovery and energy replenishment for runners.
Nutrition for Runners: Foods Rich in Magnesium

Post-Workout Recovery:

After running, having a post-workout meal is crucial for muscle repair and energy replenishment. Aim for a balanced meal with a good mix of carbohydrates, protein, and fats to support recovery. Combining proper hydration with nutrient-rich meals will help you bounce back quickly and prepare for your next run.

As you build up your mileage, remember that the more you run, the more recovery time your body needs to adapt to the increased training load. If you’re aiming to prepare for a marathon from scratch in a short time, like within a year, rushing your training could lead to injury. Your body follows its own pace, and it’s important to respect that rhythm rather than pushing too hard, too soon.

Here are some key guidelines for gradual, safe progress:

  • Slowly increase your running distance, especially if you haven’t run that much before or it’s been a while since you’ve covered such mileage.
  • Stick to the “10% rule”— avoid increasing your weekly mileage by more than 10% compared to the previous week. Rapid increases in mileage can lead to overuse injuries. For instance, if you usually run 20 miles a week, don’t jump to 30 miles in just one week.
  • Remember that progress shouldn’t be linear. Every fourth week, cut back your mileage and intensity by 40% to 60%. This helps prevent minor aches or strains from turning into major injuries, allowing your body to recover and get stronger.
To enhance your running performance and prevent injuries, it’s crucial to strengthen the muscles that support your running, including your core, skeletal muscles, and torso. While you can’t change your anatomy, you can improve both your strength and flexibility, which are key to becoming a more efficient and resilient runner.

Incorporating strength training into your routine helps reduce the repetitive strain on your running muscles. By diversifying your workouts, you give those muscles a break while still improving your fitness. Here are some ways to do this:

  • Include at least one high-intensity workout per week, such as spinning, cycling, swimming, or using an elliptical machine. These activities boost your aerobic capacity while allowing your running muscles to recover between runs.
  • Cross-training is also an excellent way to balance your training and prevent overuse injuries that can result from the repetitive impact of running. It works for different muscle groups while reducing the risk of burnout, keeping your training fresh and your body injury-free.
Spinning training on a stationary bike, focusing on building cardiovascular endurance and leg strength. This exercise is a recommended form of cross-training for runners, helping to improve aerobic fitness while giving the running muscles time to recover.

Yoga for Runners

Incorporating yoga into your routine is an excellent way to strengthen and lengthen muscles, maintain joint flexibility, and improve circulation. These benefits help reduce the risk of injury and support long-term running performance.

Yoga also enhances mental focus, which can be a game-changer during races, helping you stay calm and centered when challenges arise.

Rather than committing to a single 60-minute yoga session each week, it’s more beneficial to practice yoga for just 5 minutes daily. By focusing on areas relevant to your running, such as the hips, hamstrings, and core, you can integrate yoga into your warm-up or cool-down routines to maximize its benefits without overwhelming your schedule.

A group of people practicing yoga on a sandy beach, engaging in various poses while facing the instructor. This form of yoga enhances muscle strength, flexibility, and mental focus, which are beneficial for runners to prevent injuries and improve overall performance.
Practicing Yoga – Image by Patricia Alexandre from Pixabay

Without adequate sleep, your body struggles to repair itself, which can lead to decreased performance, persistent fatigue, and a higher risk of burnout and injuries. Make it a priority to get 7-9 hours of quality sleep per night, especially during periods of intense training.
Recovery is just as important as the workouts themselves if you want to keep progressing as a runner.

Training stresses the body physically, causing micro-damage to muscles that need time to heal. True recovery and performance improvements occur during rest, with sleep being one of the most critical components.


Both warming up and cooling down are essential for optimizing performance and preventing injuries. A proper warm-up prepares your body for the physical demands of running, while a cool-down helps your muscles recover and reduces the risk of post-run stiffness or injury.

Here’s a simple 3-step warm-up routine to follow before running:

  1. Joint Mobility: Start with dynamic movements like leg swings or arm circles to lubricate and activate your joints.
  2. Technique Drills: Perform short drills such as high knees or butt kicks to improve your running form.
  3. Light Jogging or Walking: Gradually increase your heart rate with a few minutes of brisk walking or easy jogging.

For more details on warm-up techniques, visit 3 Steps to Warm Up Before Running.


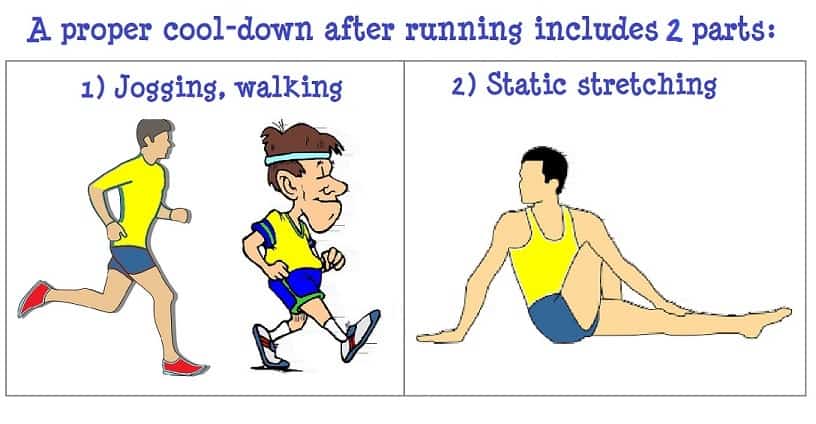
To ensure an effective cool-down:

  1. Easy Jogging/Walking: Slow down with a few minutes of light jogging followed by walking to help your heart rate return to normal.
  2. Static Stretching: Focus on holding stretches for major muscle groups (hamstrings, quads, calves) for 20-30 seconds each to aid in flexibility and recovery.

For additional cool-down guidance, check out Cool Down After Running.


Illustration demonstrating the two key parts of a proper cool-down after running: 1) Jogging or walking to gradually reduce heart rate, and 2) Static stretching to relax and lengthen muscles.
A proper cool-down after running involves light jogging or walking, followed by static stretching to aid muscle recovery.

Why do I keep getting injured running?

Most running injuries occur when there’s a sudden increase in training volume or intensity without proper technique adjustments. Whether you’re training for a marathon or trying to get in shape, it’s crucial to gradually build up your endurance, allowing your body time to adapt.

Will running daily cause injury?

Running every day can increase the risk of overuse injuries like shin splints or tendonitis if not managed carefully. However, it can be done safely by incorporating rest days with light runs or cross-training, varying intensity, and paying close attention to your body’s signals. It’s important to mix up paces and surfaces to avoid repetitive strain on the same muscles and joints. Proper recovery and listening to your body are key to avoiding injuries from daily running

Should you run on an injury?

If you’re experiencing persistent pain or an injury, stop running immediately. Continuing to train through pain can worsen the issue and prolong recovery. Give your body a few days of rest, and only return to running cautiously if the pain subsides.

What is the 10% rule in running?

The 10% Rule advises runners to increase their weekly mileage by no more than 10% each week. For instance, if you’re currently running 20 miles per week, aim to add no more than 2 extra miles the following week. This gradual approach helps prevent overuse injuries.

Do runners need to strength train?

Absolutely. Strength training plays a key role in improving a runner’s performance. It builds stronger muscles and joints, helping you run more efficiently and reducing the likelihood of injury. To maximize your potential, incorporate strength training into your routine alongside your running.


Strength training is essential for preventing running injuries and improve performance


Posted on 1 Comment

Heart Rate Monitor Watches – Stay On The Pulse

Heart rate monitor watches

A heart rate monitor watch is more than just another running accessory – it’s an essential tool for improving your fitness and staying on top of your health. By providing real-time data on your heart rate, this device helps you optimize your workouts, manage stress levels, and track your overall heart health.

1. What is a Heart Rate Monitor Watch?

A heart rate monitor watch is a wearable device that measures your heart rate in beats per minute (bpm) using sensors on the wrist. It provides real-time data on your heart rate, allowing you to track your fitness and health.

With advances in technology, many heart rate monitor (HRM) watches now include additional features such as GPS tracking, running power measurement, training programs, and more. Smartwatches also often include heart rate monitoring capabilities, along with a wide range of other features, such as step counting, calorie tracking, sleep monitoring, smartphone notifications, and even mobile payments.

2. Why is Heart Rate Monitoring Important for Runners?

Heart rate monitoring is important for running for several reasons. Firstly, it can help you improve your cardiovascular fitness. By tracking your heart rate, you can measure your progress and see if your fitness level is improving. As your cardiovascular fitness improves, your resting heart rate should decrease. While running, your heart rate can also indicate if you are pushing yourself too hard or if you can increase the intensity to reach your target heart rate zones.

Another important reason to monitor your heart rate while running is for your health. While a high heart rate during exercise can indicate that you are improving your fitness level, it can also be a sign of heart trouble. A heart rate monitor watch can provide accurate information about your heart rate and alert you if it reaches dangerous levels.

Heart rate monitoring can also be useful for heart rate training and for pacing yourself during runs. For example, if you are recovering from an injury, you may want to run at an easy pace and avoid pushing yourself too hard. A heart rate monitor watch can help you stay within a safe and comfortable heart rate zone.

In addition to monitoring your heart rate, many heart rate monitor watches also provide other useful features such as calorie tracking, fat-burning measurement, resting metabolic rate calculation, and more. These features can provide comprehensive information about your physical fitness status and help you track your progress over time.

3. Benefits of Using a Heart Rate Monitor Watch

Using a heart rate monitor watch can provide many benefits for both athletes and non-athletes alike. Some of the key benefits include:

• Improving athletic performance: By providing real-time data on your heart rate, a heart rate monitor watch can help you optimize your workouts and improve your athletic performance.

• Managing stress levels: Monitoring your heart rate can also help you manage stress levels by providing insight into how your body responds to different stressors.

• Tracking heart health: Regularly monitoring your heart rate can help you track your overall heart health and identify any potential issues early on.

In summary, using a heart rate monitor watch can help you improve your fitness, manage stress, and maintain good heart health.

4. Which Heart Rate Monitor Watch Should I Choose?

When choosing a heart rate monitor watch, it’s important to consider the two main types of heart rate monitoring technology: optical and chest strap.

Type 1 – Optical Heart Rate Monitoring

Optical heart rate monitors, such as those found in fitness trackers like Fitbit, Polar, and Garmin, as well as smartwatches like the Apple Watch and Samsung Gear, use an optical sensor to detect your pulse. The most common method for measuring heart rate using an optical sensor is called photoplethysmography (PPG). The sensor sends light waves into the skin and measures the amount of light scattered by blood flow. An algorithm then processes the data from these light signals and translates it into a pulse reading.

High-quality optical heart rate monitors use multiple light wavelengths to account for differences in skin and tissue. However, wrist movement during exercise can produce noise that interferes with the heart rate measurement, making optical technology less accurate than chest-strap technology. Despite this, optical heart rate monitors are more comfortable and easier to wear and do not cause chafing.

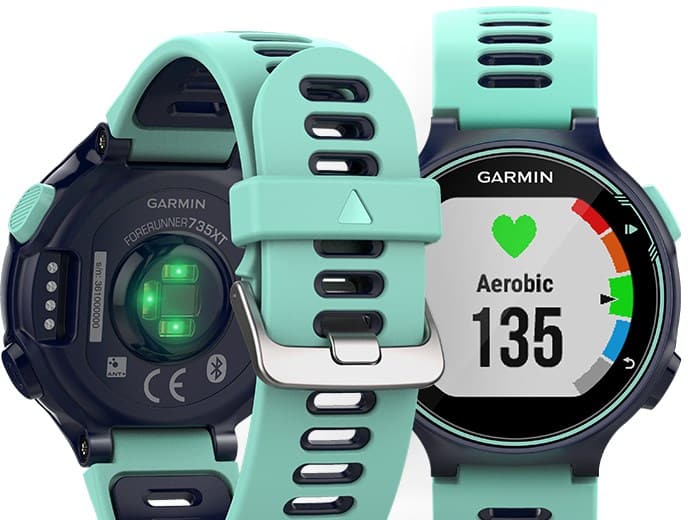
Heart Rate Monitor Watch with optical technology - Garmin Forerunner

Heart Rate Monitor Watch with optical technology 
(Garmin Forerunner)

Type 2 – Chest-Strap Heart Rate Monitoring

How Does it Work?
Chest-strap heart rate monitors use electrical pulse technology to detect the small electrical signals that prompt the heart’s muscles to contract. A wireless electrocardiography sensor on the chest strap detects these signals and transfers the pulse data to a wristwatch, which displays the heart rate.

This method provides the most accurate heart rate measurement during exercise. However, chest-strap heart rate monitors can be less comfortable to wear than optical heart rate monitors. It can take some time to get used to wearing a chest strap, and it may need to be adjusted during exercise to ensure a secure fit. Despite this, many runners find that they quickly adapt to wearing a chest strap and appreciate its accuracy.

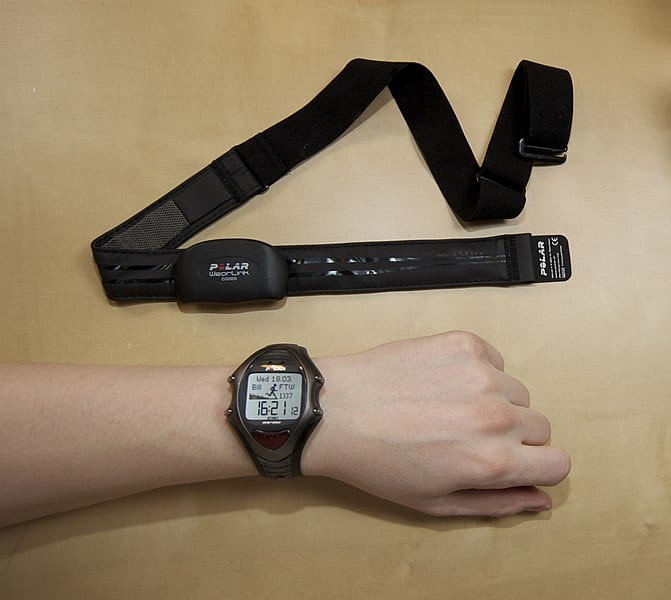
Chest-strap heart rate monitor

4.1 Comparison between Optical and Chest-Strap Heart Rate Monitoring

When choosing a heart rate monitor watch, it’s important to consider the two main types of heart rate monitoring technology: optical and chest strap. Here is a comparison chart that summarizes the differences between the two:

FeatureOptical Heart Rate MonitoringChest-Strap Heart Rate Monitoring
AccuracyLess accurate due to wrist movement during exerciseMore accurate due to direct contact with the chest
ComfortMore comfortable and easier to wearLess comfortable, may require adjustment during exercise
ConvenienceNo additional equipment requiredRequires wearing a chest strap
PriceGenerally more expensive due to additional featuresGenerally less expensive

In summary, optical heart rate monitors are more comfortable and convenient to use but may be less accurate than chest-strap heart rate monitors. Chest-strap heart rate monitors provide more accurate readings but may be less comfortable to wear and require additional equipment.

4.2 Watches with Both Optical and Chest-Strap Heart Rate Monitoring:

Some watches, such as the Suunto 9 GPS Sports Watch, offer both optical and chest-strap heart rate monitoring capabilities. These watches provide the convenience and comfort of optical heart rate monitoring, while also allowing for the option of using a chest strap for increased accuracy during exercise. This can be particularly useful for runners who want the flexibility to choose between the two types of heart rate monitoring depending on their needs and preferences


4.3. How Important is Heart Rate Accuracy?

While heart rate accuracy is important, it is not as crucial as staying within your target heart rate zone during exercise. However, accuracy does become more important when measuring heart rate recovery after exercise, which refers to how quickly your heart rate returns to its normal resting rate. Heart rate recovery time can provide valuable information about your fitness level and overall health.

4.4. Choosing a Heart Rate Monitor Watch that Fits Your Budget

If you are on a low budget, you can find a reliable and easy-to-use chest-strap HRM that does Its main job of accurately measuring the heart rate for a relatively low price. For example, the Polar Ft1 Heart Rate Monitor.

There are many heart rate monitor watches available at different price points, so it’s important to choose one that fits your budget. If you are on a tight budget, you can find reliable and easy-to-use chest-strap heart rate monitors that accurately measure your heart rate for a relatively low price, such as the Polar Ft1 Heart Rate Monitor or Fitbit Charge 5 with an optical heart rate monitor.

If you have a larger budget, you may want to consider an optical heart rate monitor watch with additional features beyond just heart rate monitoring. For example, the Garmin Fenix 7 is a sophisticated multisport watch with GPS and GLONASS satellite reception. In the premium category, you can find high-quality watches like the Apple Watch Ultra, which includes precision dual-frequency GPS, up to 36 hours of battery life, and the freedom of cellular.

5. Heart Rate Training with a Heart Rate Monitor Watch

Once you have purchased a heart rate monitor watch, you can use it to follow heart rate training programs. If your watch does not have a built-in feature for calculating heart rate zones, the first step is to determine your Maximum Heart Rate (MHR).

There are several methods for calculating your MHR. One simple and commonly used formula is to subtract your age from 220. For example, if you are 35 years old, your MHR would be 220 – 35 = 185. Another way to determine your MHR is to use a heart rate monitor watch while running. Start by running a mile at an average pace, then increase your speed over the next 1300 ft until you reach your maximum speed. The highest heart rate recorded on your watch during this exercise should be your MHR.

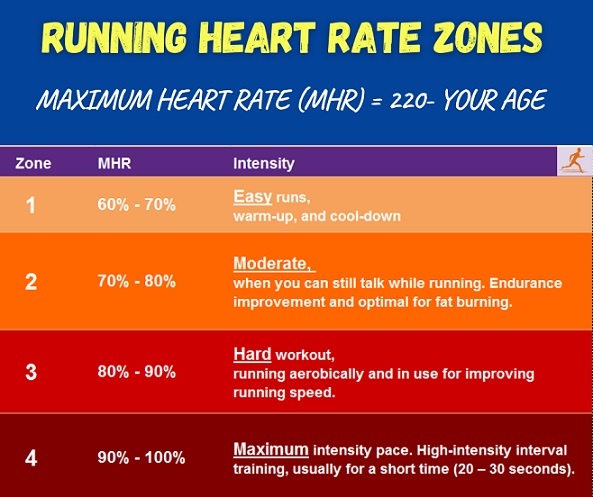
Once you know your MHR, you can calculate your heart rate training zones. Most running heart rate training programs differentiate between four zones:

Zone 1: 60-70% of your MHR. This zone is used for easy runs, warm-ups, and cool-downs.

Zone 2: 70-80% of your MHR. This zone is used for moderate running, where you can still talk while running. It is optimal for improving endurance and burning fat.

Zone 3: 80-90% of your MHR. This zone is used for hard workouts and aerobic running and can help improve running speed.

Zone 4: 90-100% of your MHR. This zone is used for maximum-intensity workouts, such as high-intensity interval training (HIIT), and is typically only sustained for short periods of time (20-30 seconds).

How To Run Using Heart Rate Zones | Running Training For Triathlon | by Global Triathlon Network (06:59)

Tips for Using a Heart Rate Monitor Watch Effectively

A heart rate monitor watch can be a valuable tool for tracking your fitness and health, but it’s important to use it correctly to get the most accurate and useful data. Here are some tips for using a heart rate monitor watch effectively:

• Wear it correctly: Make sure the watch is snug against your skin and positioned correctly on your wrist. Consult the manufacturer’s instructions for specific guidance on how to wear the watch.

• Understand the data: Take some time to learn about heart rate zones and what they mean for your fitness and health. Use the data from your heart rate monitor watch to track your progress and adjust your workouts accordingly.

• Calibrate the watch: If your heart rate monitor watch allows for calibration, take the time to calibrate it for increased accuracy.

• Keep it clean: Clean the watch regularly, especially the sensor, to ensure accurate readings.

By following these tips, you can use your heart rate monitor watch effectively to track your fitness and health.


➤ Frequently Asked Questions About Watches with Heart Rate Monitor

How does a wrist-based heart rate monitor watch work?

Wrist-worn heart-rate monitors use light to measure your pulse. They shine a light into the blood vessels in your wrist and then detect the changes in blood volume that occur each time your heart beats and push blood through your body.

How can I improve my watch’s heart rate monitor accuracy?

Answer: To improve accuracy try to avoid:
1) Wearing the watch too loose – Make sure the sensor is always in direct contact with your skin. So, you shouldn’t be able to see the light shining from the sensor.
2) Wearing the watch too tight – Wearing the watch extremely tight can cut off blood flow and reduce the sensor’s ability to monitor heart rate.

Is it worth getting a heart rate monitor?

Answer on WebMD: If you want to save money by taking your pulse, go ahead. Heart rate monitors are by no means an essential tool for fitness or even competition. “A heart rate monitor isn’t necessary for anyone,” says running coach Matt Fitzgerald, author of The New Rules of Marathon and Half-Marathon Nutrition.

What is the benefit of a heart rate monitor?

With a heart rate monitor, you’ll be safer during your workouts. Most devices and systems calculate calories burned to take only workout duration and distance into account. With heart rate monitoring, you can add intensity as a factor to get much more accurate results and know exactly how many calories you’ve burned!

What is the recommended Heart Rate Zone for long runs?

There recommended Heart Rate Zone for long runs is 𝟳𝟬% of your Maximum Heart Rate (MHR), i.e. 𝗭𝗼𝗻𝗲 𝟮 in the picture below.

Running Heart Rate Zones: Easy: 60% - 70%, Moderate: 70% - 80%, Hard: 80% - 90%, Maximum: 90% - 100%


Posted on 1 Comment

8 Tips For Running In The Heat And Humidity

Tips for Running in the Heat

Summer brings sunshine and warmth, but it also brings high temperatures and stifling humidity, making running a challenging task. However, fear not! With the following eight essential tips, you can conquer the heat and humidity, ensuring your runs remain enjoyable, safe, and successful even in the face of demanding weather conditions.


When running in the heat, our bodies undergo increased exertion compared to cooler weather. This necessitates a thoughtful consideration of the heat’s impact, both during our runs and when planning our training program.

The body expends significant energy in cooling itself, resulting in the alteration of several physiological parameters that affect our running performance. These include our pulse, breath, and lactic acid levels.

To regulate body temperature, blood flow is redirected to the skin’s surface, resulting in reduced blood supply to our muscles. As a result, the heart has to work harder, pumping more blood to compensate, leading to an elevated heart rate.

Therefore, it is essential to be more aware of our body and its needs when running in hot weather. By carefully listening to our body’s signals during runs, we can prevent avoidable issues that may pose risks to our overall health.

Acclimatization To Hot Weather:
During summer, our bodies adapt to the heat through acclimatization (adjusting to the temperature). It takes about 10 to 14 days for this gradual adjustment to occur. Understanding acclimatization helps us make informed decisions for safe and enjoyable running in hot weather.


Here Are 8 Essential Tips for Running in Hot Weather:

When confronted with hot days, it’s advisable to plan your runs during the cooler periods, which are typically early morning before sunrise or in the evening after sunset. This timing helps you avoid the peak heat and allows for a more comfortable running experience.

In locations with low humidity levels, running in the late evening may be a better option. During this time, temperatures tend to be cooler, and humidity is generally lower compared to the early morning. Opting for the late evening can enhance your overall running conditions and contribute to a more enjoyable workout.

In regions with high humidity, moisture levels are typically higher in the early morning and at night. To combat this, running early in the morning during the hottest months of the year is best. Starting earlier means cooler temperatures, which is important because heat and humidity can make it difficult for your body to regulate its core temperature, which is necessary for optimal performance and survival.

Choosing the right attire for running in hot weather is crucial for maintaining comfort and preventing overheating. Here are some tips to help you stay cool and comfortable:

Choose Moisture-Wicking Shirts: Opt for shirts made from materials like Dri-fit that wick away sweat and promote evaporation, keeping you cooler during your runs. Bright colors with minimal writing can further enhance sweat evaporation.

Invest in UPF Sun Protection Fabric: Protect your skin from harmful UV rays by choosing shirts with Ultraviolet Protection Factor (UPF) sun protection fabric. This fabric not only shields your skin but also promotes breathability.

Shield Yourself from the Sun: If you’re running under direct sunlight, consider wearing a bright, preferably white, Dri-fit hat to protect your head and face. Don’t forget to wear runner’s sunglasses and apply a high-SPF sunscreen to protect your skin.

Opt for Moisture-Wicking Running Socks: Swap your regular cotton sports socks for specialized running socks with moisture-wicking technology. These socks manage moisture and sweat effectively, keeping your feet dry and temperature-controlled.

Select Lightweight, Breathable Shorts: Choose running shorts made from lightweight, breathable fabrics that allow optimal airflow and ventilation. This aids in heat dissipation and reduces excessive sweating.

Ensure a Good Sports Bra: For female runners, a well-fitting, supportive sports bra is essential. Look for bras made from moisture-wicking fabrics that provide adequate airflow and manage sweat effectively.

Consider Cooling Accessories: Boost your comfort with cooling accessories like cooling towels or other items designed for instant relief in hot weather. These accessories can be soaked in water, wrung out, and worn on your body to help regulate temperature.

BMJL Women's High Waist Running Shorts: Super comfortable and flattering sports shorts with a zipper pocket.
BMJL Women’s High Waist Running Shorts: Super comfortable and flattering sports shorts with a zipper pocket.

Remember, the key is to stay cool and comfortable while running in the heat.


When it’s hot, our body needs more fluids to cool itself and prevent dehydration. Therefore, it’s crucial to drink plenty of fluids, preferably cold, but not too cold.

Why Hydration is Important

Proper hydration helps maintain your body’s balance of fluids, regulate body temperature, and ensure the proper function of muscles and joints. It also helps transport nutrients to give you energy and keep you healthy. If you’re not hydrated, your body can’t perform at its highest level.

Before the Run

Start hydrating well before you begin your run. Aim to drink 16 to 20 ounces of water at least 4 hours before your run. Then, about 15 to 30 minutes before you start, drink another 8 to 10 ounces. This gives your body enough time to process the fluids and prepare for the physical exertion.

During the Run

While running, it is recommended to drink a small amount of water every few minutes rather than a large amount at once. This will enable the water to cool the body instead of mainly filling the bladder.
Aim to consume 6 to 8 ounces of fluids every 15 to 20 minutes. However, this can vary based on your sweat rate, the heat, and the intensity of your run.

Especially on long runs, consider an isotonic sports drink that contains electrolytes, which are required for regulating your body’s water balance and for increasing your water absorption rate. An isotonic drink is easily absorbed and quickly leaves the stomach to ensure optimal efficiency and comfortable digestion.

Remember, the goal is to replace the fluid you’re losing through sweat, so adjust your intake based on the intensity of your run and the heat of the day.

After the Run

Post-run hydration helps with recovery. Drink 20 to 24 ounces of water for every pound lost during the run. Don’t rely solely on thirst; it’s not always an accurate indicator of your body’s fluid needs.

Additional Tips

Avoid dehydrating drinks such as coffee, tea, and sweetened juices, and especially avoid drinking alcohol before running.
Stay hydrated on long runs by carrying a sports bottle, or hydration pack, or wearing a water belt for convenient access to cool water or sports drinks.

Remember, everyone is different, so these are general guidelines. It’s important to listen to your body and adjust as necessary.


Stay hydrated while running in the Heat - Drinking water from bottles during the run.

When running in daylight hours, aim to plan your run along predominantly shaded routes, particularly toward the end of your run. Running in shaded areas can provide relief from direct sunlight and help lower the ambient temperature, making your run more comfortable.

Additionally, prioritize routes that have drinking fountains or water stations along the way. These hydration stations allow you to replenish fluids as needed and keep your body properly hydrated.
As you come across these stations, take advantage of the opportunity to cool your body down by pouring water on your head, neck, and wrist joints. This simple technique helps facilitate evaporation, aiding in the body’s cooling process and providing a refreshing sensation throughout your run.

Drinking from water fountain for staying hydrated while running in the summer
Drinking from a water fountain while running on a hot day

Don’t underestimate the significance of maintaining a healthy and balanced diet on warmer days. As a runner, it is crucial to consume nourishing foods that are rich in nutrients essential for runners and high in electrolytes.
Consider adding the following options to your diet (assuming no health restrictions):

  • Watermelon has more than 90 percent water and is rich in potassium, vitamin C, magnesium, lycopene, and cucurbitacin E (antioxidant).
  • Peaches are a good source of potassium, beta-carotene, and vitamin C.
  • Avocado is a superfood for runners, rich in nutrients, vitamins B and C, monounsaturated fat, and potassium.
  • Blueberries have antioxidants and anti-inflammatory that help muscle recovery after running.
  • Potatoes contain sodium, and potassium (in the peels) are two main electrolytes that can help restore electrolyte balance.
  • Almonds are filled with minerals, including potassium for heart health, calcium for bone health, and magnesium for energy production and electrolyte balance. They also contain iron, B complex vitamins, and vitamin E, which is a potent antioxidant with anti-inflammatory properties.

Electrolytes are minerals in your body that have an electric charge. They are in your blood, urine, tissues, and other body fluids. Electrolytes are important because they help: Balance the amount of water in your body. Balance your body’s acid/base (pH) level.”

“Fluid and Electrolyte Balance” – MedlinePlus.

Prioritize Post-Run Recovery: Essential Protein for Optimal Replenishment:
Replenishing fluids and energy after a run is crucial for your body’s recovery. The post-workout meal holds great significance, and it should prioritize including protein to support optimal recovery after running.

Nutrition for hot weather running - 
Basic Nutrition at Glance: Fruits, Grains. Vegetables, Protein
Basic healthy nutrition is made up of the five food groups in a plate template that you can follow to maintain a healthy diet.
Credit to USDA’s Center for Nutrition Policy and Promotion

Sweat is not just water; it contains vital minerals like sodium, potassium, calcium, and magnesium. When running in hot weather and sweating profusely, there is a risk of significant sodium loss, which can lead to low blood sodium levels (Hyponatremia).

To replenish electrolytes, especially sodium, that are lost through sweat during long runs, salt tablets can be an excellent option. These tablets help restore essential electrolytes, ensuring proper hydration and reducing the risk of heat cramps and muscle pain. It’s important to note that maintaining an appropriate level of sodium is crucial for your overall health, as extremely low sodium levels can pose serious risks.

Prioritizing proper electrolyte balance, including sodium replenishment through salt tablets, can greatly enhance your performance and help you stay safe during hot weather runs.

For guidance on the appropriate dosage and usage of salt tablets, consult with a healthcare professional or a sports nutritionist to determine what suits your specific needs.

Heat-Related Illness: Recognizing the Symptoms

When running in the heat, it’s crucial to be aware of the prime injury risk: heat-related illness.
If you experience any of the following symptoms, it may indicate Heat Exhaustion or Heat Stroke. In such cases, it’s essential to take immediate action: stop running, find a shaded area, and seek help.

➤ Look out for signs such as dizziness, decreased muscle coordination, weakness, vomiting, muscle cramps, loss of balance, disorientation, confusion, unusual headache, or hyperventilation.

➤ Another indicator of heat-related illness or dehydration is a sudden increase in your heart rate, surpassing your regular pulse intensity. This emphasizes the importance of running with a heart rate monitor watch, as it can help you detect any irregularities and take appropriate precautions.

Managing Expectations: Performance in Hot Weather

In hot temperatures and high humidity, it’s important to acknowledge that running performance tends to decrease. Therefore, it’s advisable not to push yourself to break personal records on scorching days, as doing so can jeopardize your health. Instead, prioritize your well-being and adjust your expectations accordingly.

Listening to Your Body: Pay Attention to Pain

While running, always pay close attention to your body’s signals. If you experience a new and unfamiliar pain, it’s advisable to slow down your pace or even stop if necessary. Ignoring pain signals can lead to further injury or complications.

Preventing Chafing: Lubrication is Key

Running in heat and humidity can often lead to chafing, causing discomfort and irritation. To combat this problem, it is highly recommended to apply an anti-chafing lubricant before embarking on your run, especially in areas prone to chafing. This straightforward yet effective preventive measure is invaluable in enhancing your running experience, minimizing unnecessary discomfort, and combating the challenges posed by heat and humidity.


By being attentive to these factors and taking proactive steps, you can ensure a safer and more enjoyable running experience in hot and humid conditions.
Remember to prioritize your health, listen to your body, and make adjustments as needed.

When facing scorching summer temperatures, don’t underestimate the option of treadmill running. Although it may not have the same appeal as outdoor running, a workout in an air-conditioned environment can be an excellent alternative on exceptionally hot days.

Furthermore, consider incorporating cross-training into your indoor workout routine. Engaging in activities such as cycling, swimming, or strength training in an air-conditioned space or at least a shaded area can offer valuable benefits. Cross-training not only helps improve muscular strength but also enhances cardiovascular endurance, complementing your overall fitness goals.

By embracing treadmill running and incorporating cross-training activities, you can maintain your training routine, stay cool, and continue making progress even during the sweltering summer months. Remember to adjust the intensity and duration of your workouts based on your fitness level and goals.

A man is running on a treadmill in a high-rise apartment with large windows showcasing a cityscape. The text overlay reads: "Treadmill Running Is a Good Option on a Warm Day." The bottom right corner displays the logo and website "NeedForRun.com."
Treadmill Running is a Good Option on A Warm Day

In conclusion, running in hot weather requires careful preparation and mindful practices. Remember to hydrate before, during, and after your run to replace the fluids lost through sweat. Adjust your running routine based on the temperature and listen to your body’s signals.

Dress appropriately in light, breathable clothing and protect your skin from the sun. Avoid dehydrating drinks and especially avoid alcohol before running. Carry a sports bottle or wear a hydration pack for easy access to water during your run.

By following these tips, you can ensure a safe and enjoyable running experience, even in the heat.


8 Tips For Running In The Heat And Humidity | Video by Need For Run (04:42)

What temperature is too hot for running?

The exact temperature that is considered too hot for running can vary depending on individual tolerance and acclimatization. However, the Road Runners Club of America (RRCA) suggests avoiding running outside if the heat is above 98.6 degrees Fahrenheit (37 degrees Celsius) and the humidity is above 70-80%.
It’s important to note that both temperature and humidity play a role in how hot it actually feels outside, a measure known as the “heat index”. High humidity can make the temperature feel hotter and make running more challenging.
hese are general guidelines; individual responses to heat can vary. Always listen to your body and take necessary precautions when running in hot weather.


How much does heat affect the running pace?

Studies reveal that runners averaging around a 5:45 pace or faster slow by approximately 1 second per mile for each 1.8°F (1°C) increase in temperature. Runners with an average pace of 7:25 to 10:00 per mile slow between 4 and 4.5 seconds per mile for each 1.8°F (1°C) increase above 59°F.


How can I stay cool while running in the heat?

1) Wear Light, Breathable Fabrics: Opt for light-colored, sweat-wicking materials. Ensure the clothing is something you’ve tested on a run before.
2) Pre-Run Hydration: Sip an icy drink before heading out.
3) Smart Route Choice: Plan your route to maximize shade and avoid the hottest areas.
4) Cool Your Neck: A study published in the Journal of Athletic Training suggests you may be able to run farther without fatigue if you hold an icy towel on your neck before starting.
5) Hydrate Regularly: Drink water every 15 minutes.
6) Cool Down with Water: Pour some water over your head during the run to stay cool.
7) Wear Thin Socks: Opt for thin, moisture-wicking running socks to prevent overheating.
Runner holding LERMX 17 oz Soft Water Bottle & Handheld Hydration Pack

How do you acclimate to running in the heat?

Gradually ease into heat training by starting with low-intensity runs. Quality runs can be done on a treadmill in a cool place. Depending on your usual running volume, fitness level, and natural heat tolerance, you may need to reduce your running volume slightly or significantly during the first days of heat exposure.


How do I get used to running in humidity?

To acclimate to running in humidity, follow these tips:

1) Gradually Increase Exposure: Start with shorter runs at a slower pace and gradually increase the distance and intensity.
2) Time Your Runs Wisely: Run during the cooler parts of the day, such as early morning or late evening, when humidity levels are lower.
3) Wear Lightweight, Breathable Clothing: Opt for clothing that allows for better airflow and moisture-wicking.
4) Stay Hydrated: Consume 4 to 8 ounces of fluids (sports drinks or water) every 15 to 20 minutes during your runs in humidity.
5) Monitor Your Weight: Weigh yourself before and after running. For every pound lost, replenish with 16 ounces of fluid.
6) Listen to Your Body: Adjust your pace or take breaks if you experience dizziness, fatigue, or signs of heat-related illness.


Posted on 2 Comments

Running Socks – Why You Need It and What to Look For When Buying

Running Socks – Why You Need It and What to Look For When Buying

We invest so much in running shoes and hardly notice the gap between the foot and the shoe – the sock.


This page contains affiliate links. If you make a purchase after clicking on a link we may earn a commission at no extra cost to you.


What are Running Socks?

Socks are designed especially for running, with extra protection for your feet, improve blood circulation, and foot health, and prevent blisters.

The fabric of running socks is breathable, and padded, and they absorb sweat, which means that the foot is drier than when wearing regular cotton socks.
These features provide temperature control and help in reducing foot problems, such as fungus, peeling, and friction blisters.

Additionally, running sock padding acts as a cushion to absorb shocks. That gives support and more protection to the legs, prevents friction with the shoe, and avoids Achilles tendon issues.

The Key Features of Running Socks:

  • Moisture-wicking technology keeps out moisture and sweat from the feet.
  • Quality stitching and without stitches in places where it will scratch your toes.
  • Usually, have anatomical design and elastic arch support that make them more comfortable and protect your feet.
    For a precise anatomical fit, several brands have also socks that conform to the left and right structure of the foot.
  • Geometric shapes in the fabric stimulate the blood and prevent movement of the foot in the shoe.
  • There are running socks with anti-bacterial technology that keeps the feet healthy and odor-free.

As said in the following review “Running Socks…Are they worth it?”, once you try them, you will not want to wear again regular socks.

EXPENSIVE Running Socks… Are they worth it? (FEETURES REVIEW) | By Jamison Michael (02:41 sec)

What to look for when buying running socks?

  1. Pleasant Materials  
    It is better to buy socks with a combination of natural fibers and synthetic materials. The popular materials in high-quality socks are nylon, wool, and polyester.
    Anyway, remember to avoid cotton, as it absorbs moisture.
  2. Comfort
    Pay attention to the stitches’ quality and where they are located.
    High-quality socks usually have seamless stitching that prevents rubbing and friction on the heel and toes.
    The cushion thickness should be thicker for cold days and thin for warm days.
    Additionally, more cushion on the ball and heel is suggested especially for trail running.
  3. Moisture Absorption
    The socks should wick sweat away from your feet and also repel water (helps in rainy winter runs).
    It is also recommended to choose socks with hypoallergenic and anti-bacterial features.
  4. Compression
    The compression improves blood circulation and reduces fatigue during and after the run.
    Also, the socks’ compression helps when recovering from injury.
  5. Reduced Friction Profile
    This is the ability of the sock to reduce movement within the shoe.
    There are fabrics with a higher level of friction than others and fabrics that slide. The running socks should have a better hold in the shoe, and smooth socks produce unnecessary micro-movement that can increase the level of friction.
Merino Wool Socks
Merino Wool Socks

So, are running socks worth it?
The answer is clearly yes. It costs more than regular sports socks, but it improves a runner’s life.

Running Socks’s Main Benefits

1) Helps to maintain good foot health
2) Prevent blisters
3) Prevent skin friction
4) Injury prevention
5) Reduce foot swelling and pain
6) Comfortability
7) Moisture-wicking


Frequently Asked Questions about Running Socks

Do running socks make a difference?

Not all socks are the same, and when it comes to running socks, a good pair of technical ones will make all the difference. Keeping your feet dry and comfortable will not only reduce your risk of blisters but keep you running confidently.

Should you wear compression socks while running?

There are no hard-and-fast rules about when to wear compression socks. Some runners like to wear them while running to increase circulation to their calves and lower-leg muscles. You can also slip them on after your shower to promote blood flow to your legs following a long run or hard session.

Benefits of Compression Socks for Runners: Aid athletic performance by improving circulation and blood flow, limiting exercise-induced peripheral edema of the lower extremity, supplying muscles with more oxygen, enhancing lactic acid removal, or decreasing muscle soreness during and post-exercise.

What type of socks are best for running?

The best running socks are ones that are made from synthetic materials such as polyester, acrylic, and CoolMax because these fibers wick moisture away from the surface of your skin. You may be familiar with these fabrics for technical running shirts, and they work great on your feet as well.

Are Compression Socks good for runners?

The theory behind the performance benefits is that graduated compression increases oxygen delivery to the muscles, improves blood circulation to the heart, and speeds up the removal of lactic acid. According to The Science of Running, another theory is that compression socks may decrease muscle vibration caused by impact.

Why are cotton socks bad for running?

Cotton retains moisture and when you have moisture, heat, and friction in a running shoe you are more likely to get blisters, calluses, and hot spots. Also, cotton gets more abrasive when wet, again not good in a running shoe.

Posted on 9 Comments

Essential Guide to Buying Running Shoes: What You Need to Know

Essential Guide to Buying Running Shoes: What You Need to Know

Selecting running shoes is more complex than picking a T-shirt; it requires a deep understanding of your individual needs to find the perfect fit that can enhance your performance and prevent injuries.

Choosing the right running shoes can significantly enhance your running experience and prevent potential injuries. However, with a plethora of brands and models available, finding the perfect pair that aligns with your physical requirements and running style can be challenging, but it’s certainly achievable.

Gaining a comprehensive understanding of the key factors to consider when purchasing running shoes can guide you towards finding the pair that fits you best.

To assist you in navigating the complexities of buying running shoes, we’ve compiled nine essential guidelines. These will help you make an informed decision and choose the shoes that best meet your needs:

Selecting running shoes is a highly personalized process, unlike purchasing universally agreed-upon high-quality appliances like washing machines. It’s not uncommon to find runners who swear by a specific model from a popular brand, while others may find the same model uncomfortable.

Running shoes are tailored to individual needs, and it’s crucial to remember that a pair that fits your friend perfectly and looks great might not necessarily be the right fit for you.

Instead of opting for a pair simply because your friend or social media influencers endorse them, it’s more beneficial to determine if those shoes meet your specific requirements. Remember, the best running shoes for you are the ones that cater to your unique running style and comfort.

Marathon runners shoes

When it comes to buying running shoes, one of the first questions you’ll often encounter is, “Will you be running on the road or trail?”. While seasoned runners may have a clear answer, beginners or amateur runners might find this choice more challenging.

Consider the environment you live in and the routes that appeal to you. If your running journey is primarily on city streets, road shoes would be your go-to choice. These shoes are designed for pavement and occasional forays onto packed surfaces with slight irregularities.

However, if you’re venturing onto rough terrains with stones, roots, dunes, or any variable surface that demands more from your ankles, road shoes may not provide the comfort or utility you need. In such cases, trail running shoes, designed for off-road routes with rocks, mud, roots or other obstacles, would be the ideal choice.

For avid runners, having two pairs of running shoes – one for the road and one for the trail – can be beneficial.
But if you’re interested in both surfaces and prefer not to buy two pairs, trail shoes can be a versatile choice. They can also serve you well on the road, provided you’re not aiming to run a marathon or race for a personal record.

Road or Trail Running Shoes?

Choosing the right running shoe greatly depends on the type of running you plan to do. Here are some key considerations based on different running activities:

  • Distance Running: If your goal is to cover long distances, opt for shoes that offer substantial cushioning and support. This helps absorb impact, protecting your feet and joints during your run. Shoes designed for distance running are typically more durable and slightly heavier than other types.
  • Speed Training: For speed or interval training, a lightweight shoe that promotes quick, agile movements would be ideal. These shoes might have less cushioning but are generally more responsive, aiding in swift movements.
  • Trail Running: If your running adventures take you off-road or onto trails, look for shoes with excellent traction and stability to handle uneven surfaces. Trail running shoes are usually more robust and come with features like toe guards and waterproof materials for added protection.
  • Daily Training: For everyday running, a versatile shoe that provides a balance of cushioning, stability, and durability would be a good choice.

Remember, there’s no one-size-fits-all when it comes to running shoes. The best pair for you depends on your individual needs, running style, and the type of running you engage in. So prioritize comfort and fit when choosing a running shoe, and don’t hesitate to try out different models to find the perfect match.

While most running shoes on the market are categorized as Neutral Models, suitable for runners with no specific foot issues, it’s important to note that many runners may require different types of shoes.

So, how do you determine which model type you need? Here are some steps:

  • Examine Your Old Shoes: Look at the wear pattern on your old running shoes. This can give you clues about your foot type and gait.
  • Conduct a Video Test: Ask someone to record a video of you running, focusing on the movement of your legs and feet. If the angle of your ankle and foot remains the same when you step down, you have a neutral foot type.
  • Identify Overpronation: If your foot collapses inwards (right foot to the left and vice versa), you have overpronation. In this case, shoes with added support are recommended. These shoes have additional support in the arch area to prevent the foot from collapsing.
  • Consider Motion Control Shoes: For runners with severe overpronation or flat feet, Motion Control shoes are a suitable choice. These shoes offer extra support that aids in maintaining proper foot posture. Additionally, for runners who are overweight—a common factor contributing to overpronation—shoes with maximum support are recommended.
3 Types of Foot Strikes: Profanation, Neutral and Supination
3 Types of Foot Strikes: Profanation, Neutral, and Supination

In summary, if your arch is normal, your previous running shoes show even wear, and you pass the video test, you likely have a neutral foot type. If you notice overpronation or your shoes show excessive wear on the inner edge, consider support shoes. If you have severe overpronation or are significantly overweight, Motion Control models may be the best fit for you.


Example of Motion Control Running Shoes-  New Balance Women's 1540 V3 Running Shoe

Example of Motion Control Shoes- New Balance Women’s 1540 V3 Running Shoes


When choosing running shoes, consider the following:

  • Avoid the ‘Expansion’ Myth: Contrary to popular belief, running shoes do not expand over time. Your shoes should feel comfortable from the moment you first wear them.
  • Size Up: Typically, your running shoes should be one size larger than your regular shoes. This ensures there’s ample space for your toes, preventing discomfort or injuries like broken nails.
  • Avoid Tight Shoes: Running shoes generally don’t stretch over time. If your shoes are too tight, they could cause discomfort or even injuries.
  • Consider Shoe Width: If you have wide feet, look for models specifically designed with wider widths. Conversely, avoid shoes that are too wide for your feet. You can check this by lacing up the shoes. If the eyelets of the laces are too close together and the laces are excessively long, the shoe might be too wide for you.

Leveraging Shoe Size Charts Effectively

 While shoe size charts are a common tool, they can be incredibly helpful when used correctly. Here’s how to make the most of them:

  • Understand the Sizing System: Shoe sizes can vary significantly between brands and even between different models from the same brand. Familiarize yourself with the specific sizing system used by the brand of the shoe you’re interested in.
  • Measure Your Foot: For the most accurate size, measure your foot in the evening (when it’s at its largest) using a ruler or measuring tape. Measure the length from the heel to the tip of your longest toe.
  • Consider Width: Some people may need a wider or narrower shoe size. If your feet are wider or narrower than average, look for brands that offer width options.
  • Account for Running Socks: Remember to account for the thickness of your running socks, which can affect the fit of the shoe.
  • Try Before You Buy: If possible, try on the shoes with the socks you plan to run in. Walk or jog around the store to ensure they feel comfortable.

Remember, the key to a comfortable run is a well-fitted shoe.

As a runner, whether you’re a beginner or seasoned, it’s important to understand your foot strike pattern. This refers to which part of your foot hits the ground first during your run: the heel, midfoot, or forefoot. Your foot strike pattern can guide your selection of running shoes.

Another crucial term in the world of running shoes is ‘Drop’. This refers to the height difference between the heel and the forefoot in the shoe.

Why is it Important to Know Which Part of the Foot You Land On?

If the shoe’s drop doesn’t align with your foot strike pattern, it could potentially lead to running injuries. For instance, if you land on the middle of your foot, a shoe with an above-average drop could negatively impact your training.

When it comes to specifics, running shoes with a drop between 5 and 9 millimeters are generally recommended. However, if you’re a heel striker, you might benefit from shoes with a higher drop of more than 10 millimeters. If you land on your toes, you have the flexibility to choose from a wider range of drops.

WHITIN Men's Cross-Trainer | Barefoot & Minimalist Shoe | Zero Drop Sole | Wide Toe Box

WHITIN Men’s Cross-Trainer | Barefoot & Minimalist Shoe | Zero Drop Sole | Wide Toe Box


Research indicates that lightweight racing shoes can enhance performance during a race. As a result, many shoe brands today offer distinct models for training and racing.

Racing shoes are typically minimalist in design, offering less cushioning and support compared to their training counterparts. The rationale behind this is to reduce weight and increase speed.

The recommended weight of your racing shoes often depends on the distance you plan to run. The shorter the distance, the lighter the shoes should be.

Here are examples of popular shoe brands that offer separate models for training and racing:

Nike:

Brooks:

As the racing distance decreases, it is advisable to opt for lighter racing shoes.

While the importance of the right shoe size is already mentioned in the article, it’s crucial to further emphasize the role of comfort and fit in selecting the perfect running shoe.

A well-fitted shoe not only enhances your running experience but also helps prevent potential injuries. Here are some tips to ensure a good fit:

  • Try on shoes in the afternoon: Our feet tend to swell throughout the day, and they are usually at their largest in the afternoon. Trying on shoes at this time can help you find a size that will comfortably accommodate your foot at its biggest.
  • Check for enough space around the toes: There should be enough room in the toe box for your toes to move freely. A good rule of thumb is to ensure there’s about a thumb’s width of space between your longest toe and the end of the shoe.
  • Ensure the heel doesn’t slip: The heel should fit snugly in the shoe without slipping. If the heel slips out easily, it could lead to blisters or instability while running.

Remember, the key to a good running shoe fits well and feels comfortable from the start. There should be no need for a ‘breaking-in’ period. If the shoe doesn’t feel right in the store, it won’t feel better on your run.

Purchasing running shoes online can be a convenient and time-saving option. However, it can also be challenging due to the inability to try on the shoes before buying. Here are some tips to help you make an informed decision:

  • Know Your Size: Measure your foot size accurately at home. Remember, your running shoe size might be larger than your regular shoe size.
  • Understand the Return Policy: Before making a purchase, understand the online store’s return policy. Ensure they allow returns or exchanges if the shoe doesn’t fit well.
  • Read Customer Reviews: Customer reviews can provide insights about the fit, comfort, and durability of the shoe. Look for reviews from people who have a similar foot type and running style to yours.
  • Consider Shoe Width: If you have wide or narrow feet, check if the online store offers different width options.
  • Research the Shoe Model: Different models from the same brand can vary in fit and feel. Research the specific model you’re interested in to understand its features and how it might suit your needs.
  • Check for Deals: Online stores often have sales and discounts. Keep an eye out for these deals to get your desired running shoes at a lower price.

➤ Summary of Guidelines for Buying Running Shoes

When buying running shoes, it’s important to remember the following key points:

  1. Individual Preferences: What works best for your friend may not be the best for you. Everyone has unique foot shapes, running styles, and preferences.
  2. Trail or Road: Consider where you’ll be running. Choose trail running shoes for off-road and uneven surfaces, and road running shoes for pavement and flat surfaces.
  3. Neutral or Motion Control: Understand your foot type. Choose neutral models if you have a normal arch, support models for overpronation, and motion control models for severe overpronation or flat feet.
  4. Size Matters: Your running shoes should be 1/2 to 1 size larger than your regular shoes to accommodate foot expansion during running and prevent discomfort or injuries.
  5. Understand ‘Drop’: The ‘Drop’ of a shoe should suit your running style. It refers to the height difference between the heel and the forefoot in the shoe.
  6. Training or Racing: Consider whether you need training shoes for regular runs or racing shoes for competitive events. Racing shoes are typically lighter but offer less support and cushioning.

Most importantly, there’s no universal “best” running shoe. The best running shoes are the ones that suit your physical requirements and running activity type.

Buying running shoes - Guidelines Summary
Buying running shoes – Guidelines Summary

Maintaining your running shoes is crucial for ensuring they provide the support and protection you need. Here are some tips for taking care of your shoes:

  • Clean Your Shoes Regularly: After a run, especially on muddy or wet terrain, clean your shoes by removing any dirt or debris. Avoid washing them in a washing machine as it can damage the shoe structure and cushioning.
  • Dry Your Shoes Properly: If your shoes get wet, dry them properly to prevent the growth of bacteria and fungi. Avoid placing them near a heat source as it can warp the shoes. Instead, remove the insoles and let them air dry.
  • Rotate Your Shoes: If you’re a frequent runner, consider having more than one pair of running shoes. Rotating your shoes can allow them to fully recover their cushioning between runs and extend their lifespan.

Knowing when to replace your running shoes is equally important. Here are some signs that it’s time for a new pair:

  • Mileage: Most running shoes last between 400 to 500 miles. However, this can vary based on the runner’s weight, running style, and the surfaces they run on.
  • Wear and Tear: Visible signs of wear and tear, like worn out soles or holes in the upper, are clear indicators that you need new shoes.
  • Comfort and Pain: If your shoes no longer feel comfortable or you start experiencing pain or discomfort when running, it might be time for a new pair.

Remember, running in worn-out shoes can increase the risk of injury. So, keep an eye on your shoes’ condition and replace them when needed.


➤ Buying Running Shoes – Frequently Asked Questions

Should running shoes be a size bigger?

Conventional wisdom suggests that running shoes should be about a size or half-size larger than your dress or casual size. This recommendation accounts for the increased blood flow and swelling during and after running, which causes the feet to expand.

Can you wear running shoes every day?

It’s best to reserve your running shoes for actual running activities to maximize their lifespan, typically ranging from 300 to 500 miles. Limit wearing them for non-running activities to no more than 3 days per week, with a total mileage of up to 15 miles.

How many pairs of running shoes should I have?

It is advisable for runners to have at least two pairs of running shoes that they frequently use and rotate between workouts. This practice helps to increase the lifespan of the shoes by spreading the mileage across different pairs.
For those who engage in both road and trail running, it is recommended to have a pair of road running shoes as well as a pair of trail running shoes.


Running shoes

How often should you replace your running shoes?

A general guideline is to replace your running shoes every 300–400 miles, considering factors such as your running style, body weight, and the running surface. Lighter runners may stretch this to 400 miles, while heavier runners should replace shoes closer to 300 miles.

What color of running shoes should I choose?

When selecting running shoes, consider the color based on the surfaces you typically run on. For concrete or asphalt surfaces, opt for shoes with black soles, as they endure wear and tear better. If you primarily run on padded tracks, treadmills, grass, or dirt trails, colored soles are a suitable choice.

How can you tell if you Overpronate?

Examine the bottom of your shoes for signs of wear and tear, which may indicate overpronation. Furthermore, watch for symptoms like heel or arch pain, flat feet, corns or calluses, and discomfort in the knees, hips, or back.


Posted on 1 Comment

10 Tips for Unparalleled and Safe Trail & Cross Country Running

Cross Country Running

Embracing both challenge and excitement, trail and cross-country running offer breathtaking views that are a reward in themselves. Unlike the monotony and predictability of road running, cross-country running is a journey into the unexpected. Every step is a decision made in real time, a testament to your concentration, agility, and quick thinking. This dynamic sport demands more of you than a casual run in the park or on a paved road.

To ensure your runs are both successful and safe, we present our top 10 unparalleled tips for mastering cross-country running.

1.  Equip Yourself with Knowledge: Master the Course

Before embarking on your run, arm yourself with as much information about the course as possible. Utilize tools like Google Maps to familiarize yourself with the area’s unique features. Take into account the weather conditions and how they might affect the terrain.

In this digital age, running and sports smartwatches have become invaluable companions for outdoor navigation. Devices like the Garmin Fenix 6X come preloaded with topo maps, while the Suunto 7 can automatically download local maps when connected to WiFi. Harness these technologies to plan your route and stay on track.

SUUNTO 7 GPS Sports Smartwatch with free offline outdoor maps. Local maps will be downloaded automatically when you’re connected to WiFi, or you can manually download the map of your preferred location.
Course Navigation with Suunto 7 watch

2. Embrace the Challenge: The Joy of Running Uphill

While running uphill presents its own set of challenges, it’s an adventure that offers a multitude of benefits for runners. It’s a powerful muscle builder, step length enhancer, and a catalyst for improving your running technique. It bolsters mental strength and can even boost your running speed.

Moreover, hill running can significantly elevate your VO2 max, a key indicator of your cardiorespiratory fitness. In essence, conquering hills can transform you into a more proficient runner.

Mastering the Uphill Run
Running uphill can be easier by maintaining a slight forward lean or keeping your back straight. Over-leaning can overwork your hip flexors and limit your knee lift. A useful tip is to envision yourself standing tall, which can prevent excessive leaning.

How To Run Uphill | Running Tips For Triathletes | Video by Global Triathlon Network (02:54)

Uphill Running Tips:

  • Posture: Stand tall and lean into the hill from your ankles, not your hips.
  • Stride: Shorten your stride and maintain quick foot contact to stay tall and manage your effort.
  • Arm Movement: Drive your arms straight forward and backward like pistons. This will help you overcome obstacles when running off-road. Aim to keep them at a 90-degree angle and drive forward rather than across.
  • Pacing: Concentrate on effort rather than pace to avoid burning out early on a climb.

For a visual guide, check out the above video: “How To Run Uphill” by the Global Triathlon Network.

Every uphill run is a step closer to becoming the best version of yourself as a runner. Embrace the challenge, stay positive, and enjoy the journey!

3. Embrace the Power of Walking When Necessary

Even world-class trail runners understand the importance of a well-timed walk. When transitioning to a walk, aim to increase your step length compared to when you’re running. This shift engages your large leg muscles more effectively.

Be mindful of your gastrocnemius muscles during this transition. These muscles, located in your calves, can tire more quickly than your quadriceps. By managing their use, you can maintain your stamina and ensure a successful run. Remember, knowing when to walk is just as important as knowing when to run. It’s all part of the journey.

4. Master the Art of Running Downhill

Being a proficient climber is important, but excelling at downhill running is equally crucial. When faced with a steep descent, aim to keep your knees as stable as possible and focus on quick, short steps with the lower part of your legs. This technique reduces stress on your legs compared to taking larger steps and landing heavily.

While our instinct may be to lean back when running downhill, this can strain your joints and lower back. Instead, lean slightly forward to maintain balance and control.

Remember, the risk of injury increases when running downhill compared to uphill. Always prioritize safety. If the terrain becomes too steep, don’t hesitate to slow your pace or transition to a walk. Every step counts in your journey to becoming a better runner.

5. Absorb Wisdom: Learn from More Experienced Runners

Running alongside a cross-country runner who boasts more experience than you can be incredibly beneficial. As you run, observe their techniques, their rhythm, their form. There’s a wealth of knowledge in their stride that you can learn from.
Interestingly, even without conscious effort, when we share the trail with someone more skilled, we tend to mirror their movements over time, thereby enhancing our running prowess. Remember, every great runner was once a beginner who learned from others.

Trail running - Two runners

6. The Three-Step Strategy: Scan, Plan, and Run

In the dynamic world of cross-country running, no two steps are the same. This requires you to constantly scan your surroundings and plan your next move. This continuous vigilance not only enhances safety but also enables faster running.

Your body has a remarkable ability to remember what it has seen and react accordingly. So, keep your gaze ahead, not on your feet. By focusing a few feet ahead, you can run more naturally without overthinking each step.

The Art of Visual Navigation During a Run

Your eyes are your navigational tools. Keep them focused on the ground 15 to 50 feet ahead, continuously identifying the optimal path. The more challenging the terrain, the more obstacles there are to spot and decisions to make. This means you’ll need to scan smaller areas, about 6 to 30 feet ahead.

In contrast, in an open area, you have the luxury to look further ahead. Here, you can plan your route at least 50 feet in advance. Remember, your eyes are the key to mastering the art of cross-country running.

7. Perfecting the Pace: Adapting to the Terrain

Adapting your pace to the area and topography is a crucial skill in trail running. Here are three key factors that can influence your pace:

  • Incline Variations: The slope of the terrain can significantly affect your speed.
  • Transition from Uphill to Steep Downhill: The end of a climb often brings about an oxygen shift, leading to decreased concentration and muscle fatigue. Rushing downhill without allowing for recovery can be extremely hazardous and may lead to errors in route selection.
  • Switching from Flat or Pathed Terrain to Rocky Ground: Transitioning to a rocky surface requires a different running approach. Adjust to the sensation of running on stones to minimize the risk of ankle injuries.

Remember, the ability to change pace according to the terrain is a mark of a seasoned trail runner.

8. Boost Your Running Energy

During endurance activities like long-distance or trail running, we must supply our muscles with a steady stream of glycogen. Proper nutrition not only fuels our bodies, enabling us to maintain high energy levels and enjoy the run, but it also sharpens our focus.

This heightened concentration is essential for preventing falls and injuries, especially when navigating challenging cross-country terrains. One effective method to ensure a consistent energy supply is the consumption of energy gels. These gels are not only easy to use while on the move, but they’re also conveniently portable, making them an ideal companion for runners.

9. Cross-Country Running Safety

  • Companion for New Routes: When embarking on a new running route or area, it’s highly recommended to have a companion who is familiar with the terrain. This not only enriches the experience through shared camaraderie but also provides a safety net in case of emergencies.
  • Inform Someone About Your Route: If you find yourself running alone, always inform someone about your planned route. This ensures that someone is aware of your whereabouts, which can be crucial in case of an unexpected situation.
  • Carry a Mobile Phone and a Physical Map: Carrying a mobile phone is essential for communication purposes. In areas where GPS signals may be unreliable, having a physical map can be a lifesaver. It allows you to navigate the terrain confidently and safely.
  • First Aid Kit: Having a basic first aid kit during your runs is a prudent measure. It equips you to handle minor injuries and can be vital in more serious situations until professional medical help arrives.
  • Stay Hydrated: Hydration is key during long runs. Using a water pack, belt, or bottle can help maintain your water intake throughout your run, preventing dehydration and its associated risks.

10. Essential Gear for Trail and Cross-Country Running

Trail and cross-country running require more than just a pair of all-terrain shoes. It’s about equipping yourself with the right gear to enhance your performance and safety.

All-Terrain Trail Running Shoes: These specialized shoes are designed to protect your feet from potential hazards like stones or roots while providing excellent shock absorption. The soles are typically rigid, offering superior traction in muddy or slippery conditions. The reinforced toe box is another feature, designed to provide extra protection for your toes.

Clothing: Choose moisture-wicking fabrics to keep you dry and comfortable. Layering is key for adapting to changing weather conditions. Don’t forget a hat or visor for sun protection and gloves for colder climates.

Hydration Packs: Hydration is crucial during long runs. Hydration packs are an excellent way to carry water as they distribute the weight evenly across your back and allow hands-free drinking.

Headlamps: If you plan on running in low-light conditions or at night, a headlamp is essential. It not only allows you to see the trail ahead but also makes you visible to others.

Remember, the right gear can significantly enhance your trail and cross-country running experience. Choose equipment that suits your specific needs and preferences. Happy running!

Trail Running Woman

Trail & Cross Country Running Frequently Asked Questions:

How often should you trail run?

If you’re preparing for a trail race, it’s recommended to incorporate trail running into at least 50% of your training sessions. This typically translates to running on trails at least twice a week, with the remaining sessions conducted on roads.

What constitutes a good pace for trail running?

Trail running often requires a slower pace compared to road running due to the varying terrain. A good rule of thumb is to aim for a pace that’s approximately 10 to 20 percent slower than your average road running pace. For instance, if your easy run pace on the road is 10 minutes per mile, anticipate a trail running pace of around 11 to 12 minutes per mile.

Does trail running burn more calories?

Yes, trail running can potentially burn up to 10% more calories compared to road running. This is due to the increased balance and agility required to navigate trails. Additionally, trail running is generally easier on your bones and joints, making it a popular choice among runners of all levels to prevent overuse injuries.

What are the advantages of cross-country running?

Cross-country running offers numerous benefits, including:
1. Enhanced lung capacity
2. Comprehensive muscle engagement
3. Potential for weight loss
4. Boosted immune system strength
5. Fostering a sense of teamwork
6. Providing a sense of personal accomplishment
7. Lower impact on joints compared to road running
8. Stress reduction

In summary, cross-country running can contribute to improved running performance and overall strength.